Configure Azure Graph API for Chime V5
First Steps Setting Up SharePoint Import Integration
This article is intended to assist with the setup of Azure Graph API for Chime v5 SharePoint Importer feature.
As part of this setup, we will need to do the following steps to have this feature fully configured:
Add the SharePoint (Site) Application Permission onto your Chime App Registration and have it approved by an Azure Admin.
Setup the SharePoint Importer Setting in Chime Admin area.
Have an Azure Admin consent to the application changes that were made.
Important Roles
As part of this setup and configuration process, a tenant administrator for the Microsoft Office 365 tenant will need to perform several actions in order to provide the necessary authorization for the SharePoint connector.
Azure Admin with permissions to grant consent on App Registration Permission updates
Chime Admin
App Registration
From the app registration, save the following values:
The application ID (referred to as Object ID on the Microsoft Entra admin center) assigned by the app registration portal
A client secret (application password)
Azure Graph API SharePoint (Site) Permission
Steps for Azure Admin for setting up permissions:
- Navigate to https://portal.azure.com/ and then Microsoft Entra ID (previously Azure Active Directory)
- Click on the App Registrations option on the left-side menu.
- Select the application that is used for your Chime deployment.
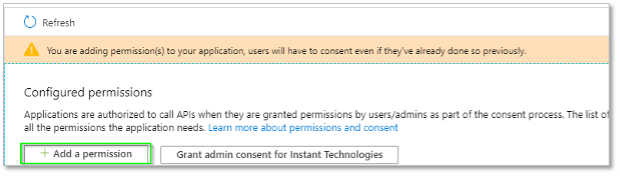
- In this new view, click the API Permissions button.

In Azure look the API permissions area
In the Azure portal, look at the app registration and API permissions
Add permission to help configure the graph API
In the Azure portal adjust the graph api permissions
- Select Microsoft Graph from the list of Microsoft API’s listed.
Common Microsoft APIs
- Select Application permissions.
- Use the search bar to find and add the following required permissions:
- Sites.Read.All
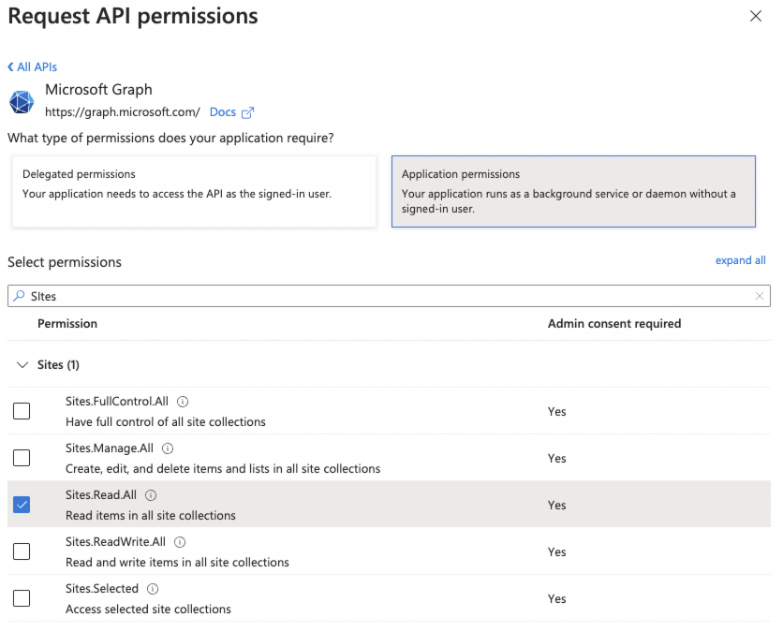
Enable Sites.Read.All to provide graph API permission so that our application can import SharePoint content for chat FAQs
All graph sites.read.all to enable our FAQs to import content
Click the Add Permissions button.
It is necessary to grant administrator consent for this permission. Click the Grant admin consent button.

Grant admin consent will also be necessary
The Sites.Read.All will be allowed using grant admin consent
- For creating Client Secret click the Certificates & secrets button.
Create a client secret using the certificates and secrets
- Click the New client secret button.
- Enter a description for your client secret.
- Click **Add **to create a new API key.
- Copy the newly created API secret key somewhere you can retrieve it. You will need this API secret key when configuring the SharePoint Importer feature.

Using SharePoint content as part of ChatBot or Chat FAQ system requires some graph API permissions
This new API secret will allow our platform to access the SharePoint content to import FAQs