6 Steps to Apply Branding To Your Teams App
Customize Your App From The Teams Admin Center
By default, the service desk application has a default icon, and name, that will be displayed in the Microsoft Teams client. Some customers may want to provide a different icon, or name. Follow these instructions as a Teams Admin to update the branding.
Step 1: Go to the Teams Admin Center
URL: Teams Admin Center
Description: Navigate to the Microsoft Teams admin center using the link provided.

Navigate to your Microsoft Teams admin center where you can find you help desk app
This is the dashboard from where you can manage all settings related to Microsoft Teams.
Step 2: Navigate to Manage Apps
Path: Teams apps > Manage apps
Description: Once you are in the Teams admin center, locate the sidebar menu. Click on "Teams apps," and then select "Manage apps."

Within Teams admin center navigate to Manage apps to view your service desk app
This section allows you to view and manage all the Teams apps available to your organization.
Step 3: Select the App to Customize
Action: Find the app you need to customize and click the app name.
Description: In the "Manage apps" list, search for the app you wish to customize. Click on the name of the app to open its specific settings and customization options. For example, search “Chime V5” and click on “Chime V5“.

In the Manage apps page search for your service desk app you want to customize
You can use the search bar to find the app quickly.
Step 4: Enter Customization Mode
Action: Click the customize icon.
Description: After selecting the app, look for the customize icon. Click this icon to enter the customization mode for the selected app.

Select your service desk app and select the customize button
The customize icon looks like a pencil
Step 5: Make Your Changes
Description: In the customization mode, you can modify settings of the app. You are able to change visuals, and other settings to better suit your team's branding.
Action: Update any of the settings for App details, or Icons. For Icon updates, you will want to take a look at the Microsoft documentation for updating App Icons to make sure any changes you make are applied correctly. Primarily, you will want to make sure the Color Icon is exactly 192 x 192 pixels and the Outline Icon is exactly 32x32 pixels and either white with a transparent background or transparent with a white background. No other colors are allowed.
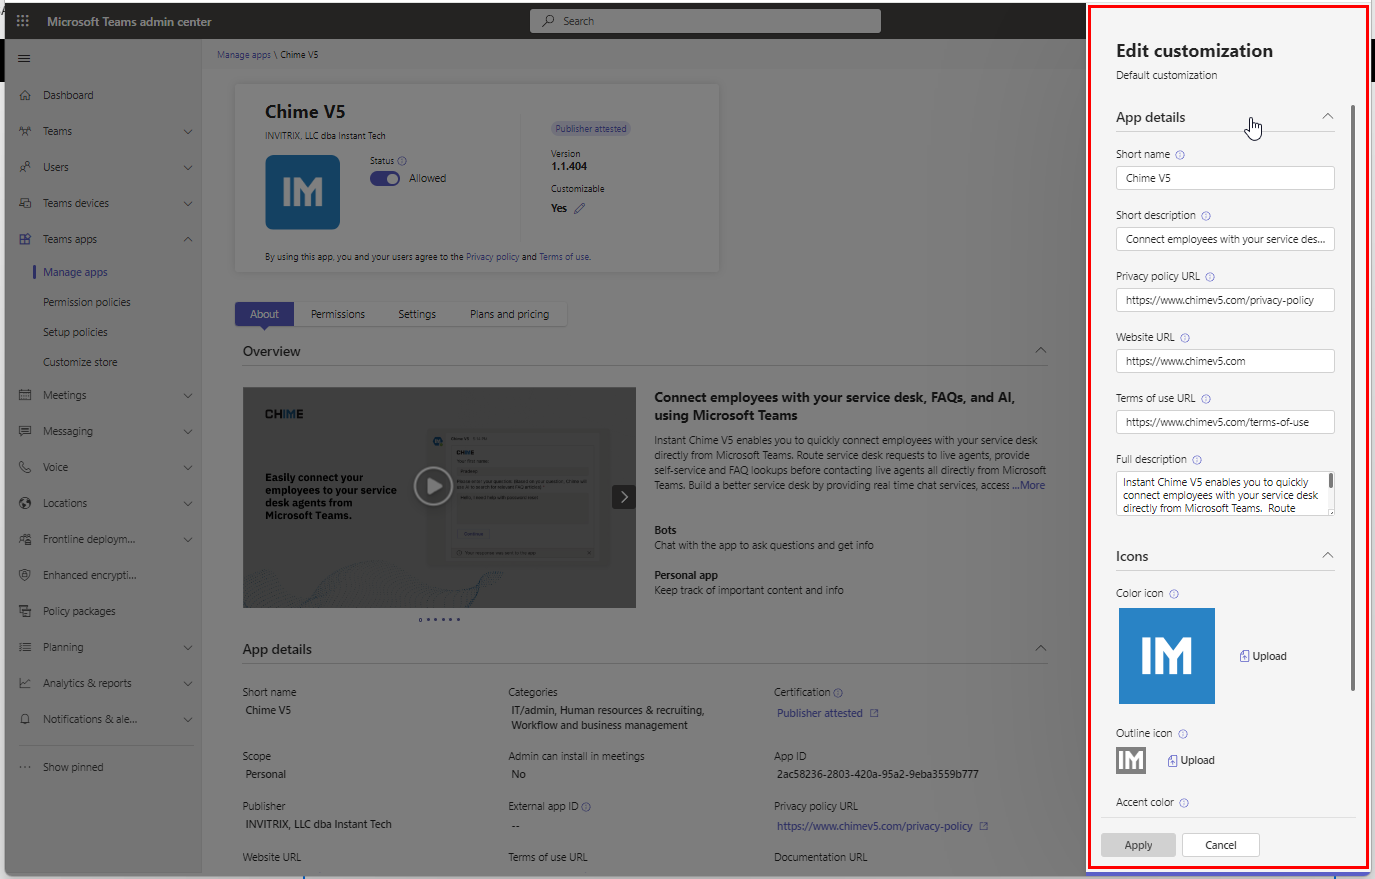
Within the customization menu you can edit the details of your service desk app
Key categories to edit include the short name, short description, and icons
Step 6: Apply Changes
Action: Click "Apply".
Description: After making the necessary changes, make sure to save and apply them by clicking the "Apply" button. This will update the app with your custom settings across your organization’s Teams platform.
Additional note on updating Teams apps:
After you have made any branding/styling changes to the Chime V5 Teams app during this process some users may see the old version of the app name or an old/broken app icon in their Teams client.
This can typically be fixed by having the user logging out of Teams and logging back in. If that doesn’t work, the user can go in and manually clear the cache in teams following this Microsoft guide: Clear the Teams client cache >>
Please contact us at support@instant-tech.com if you have any questions.