How to Set Up RAG
Note: The resources shown in these screenshots have already been deleted. You’ll need to create your own for this to work.
The following document shows how to setup RAG in Chime V5. RAG allows you to chat with your Chime V5 knowledge base articles and files (PDF, Word documents, PowerPoints, and so on.)
There are 11 steps:
Create Azure Storage Account
Create a Storage Container
Create Azure AI Search Service
Create Azure OpenAI
Open Azure AI Foundry Portal
Deploy gpt-4o Model
Deploy Text Embedding Model
Connect gpt-4o Model to Storage and Search Service
Connect Azure OpenAI to Chime V5
Connect Azure Storage to Chime V5
Connect Azure AI Search Service to Chime V5
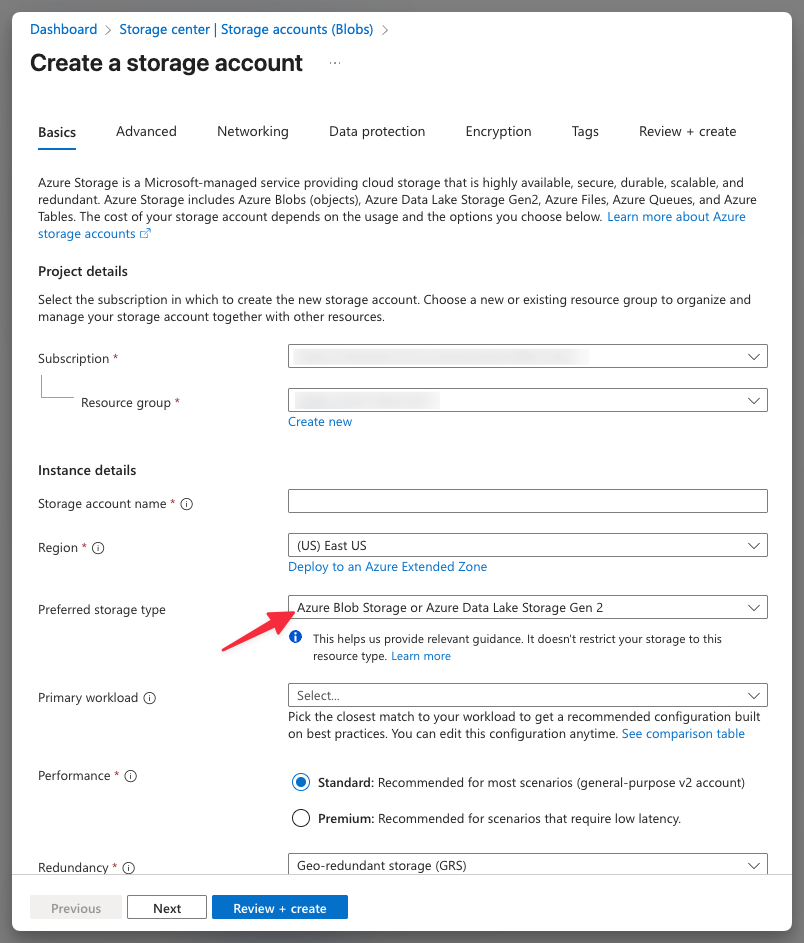
Step 1: Create Azure Storage Account
Please go to Azure and create a Storage Account. You can do this directly from here: https://portal.azure.com/#create/Microsoft.StorageAccount
Note: Please select Blob Storage (highlighted by the red arrow on screenshot below).
Step 2: Create a Storage Container
Once you create Storage Account, please open the resource, and click the Containers menu. Then:
Click Add containers
Enter container name (you will need this later)
Click create
After you create a container, it should appears on the container list.

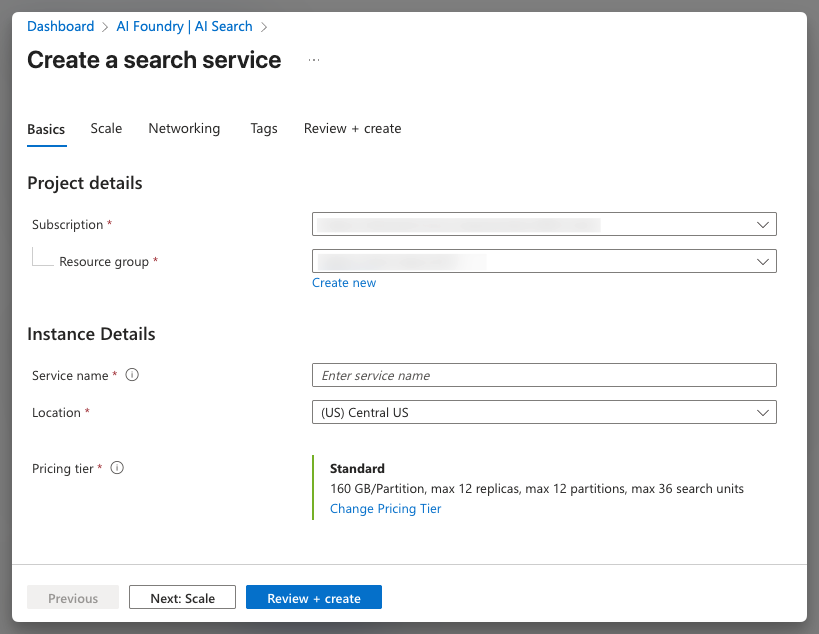
Step 3: Create Azure AI Search Service
Open this URL to create: https://portal.azure.com/#view/Microsoft_Azure_Search/Create.ReactView
Note: Please select paid pricing otherwise it would not work.
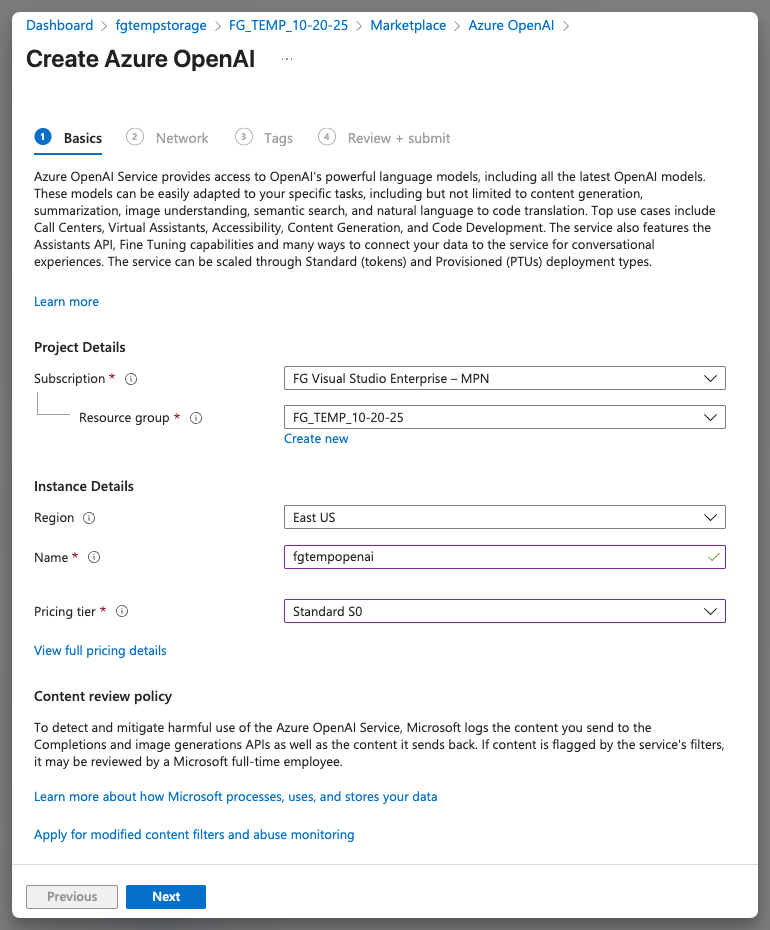
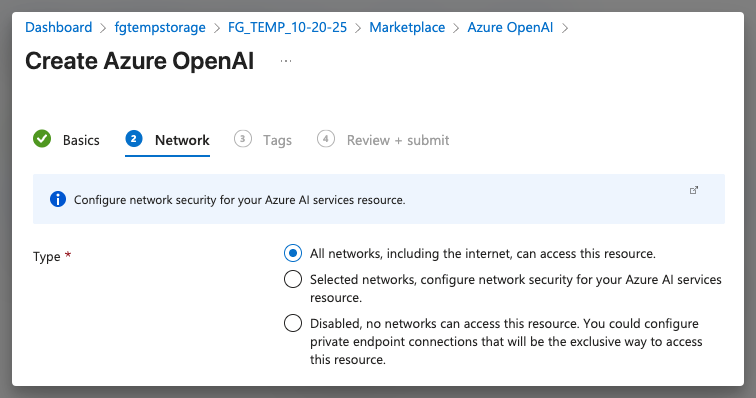
Step 4: Create Azure OpenAI
Open this URL to create: https://portal.azure.com/#view/Microsoft_Azure_ProjectOxford/OpenAICreate_Dx
Please select All networks.
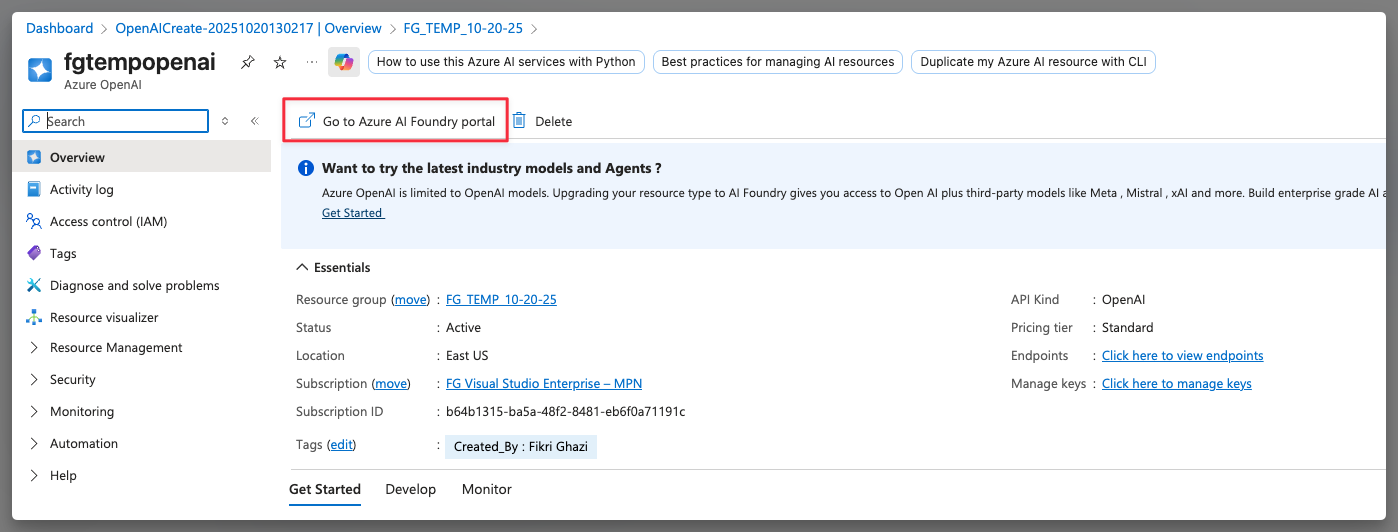
Step 5: Open Azure AI Foundry Portal
Open your Open AI resource, then click “Go to Azure AI Foundry Portal” highlighted in red below.
Step 6: Deploy gpt-4o Model
One in the portal, then click Deployments > Deploy model > Deploy base model.
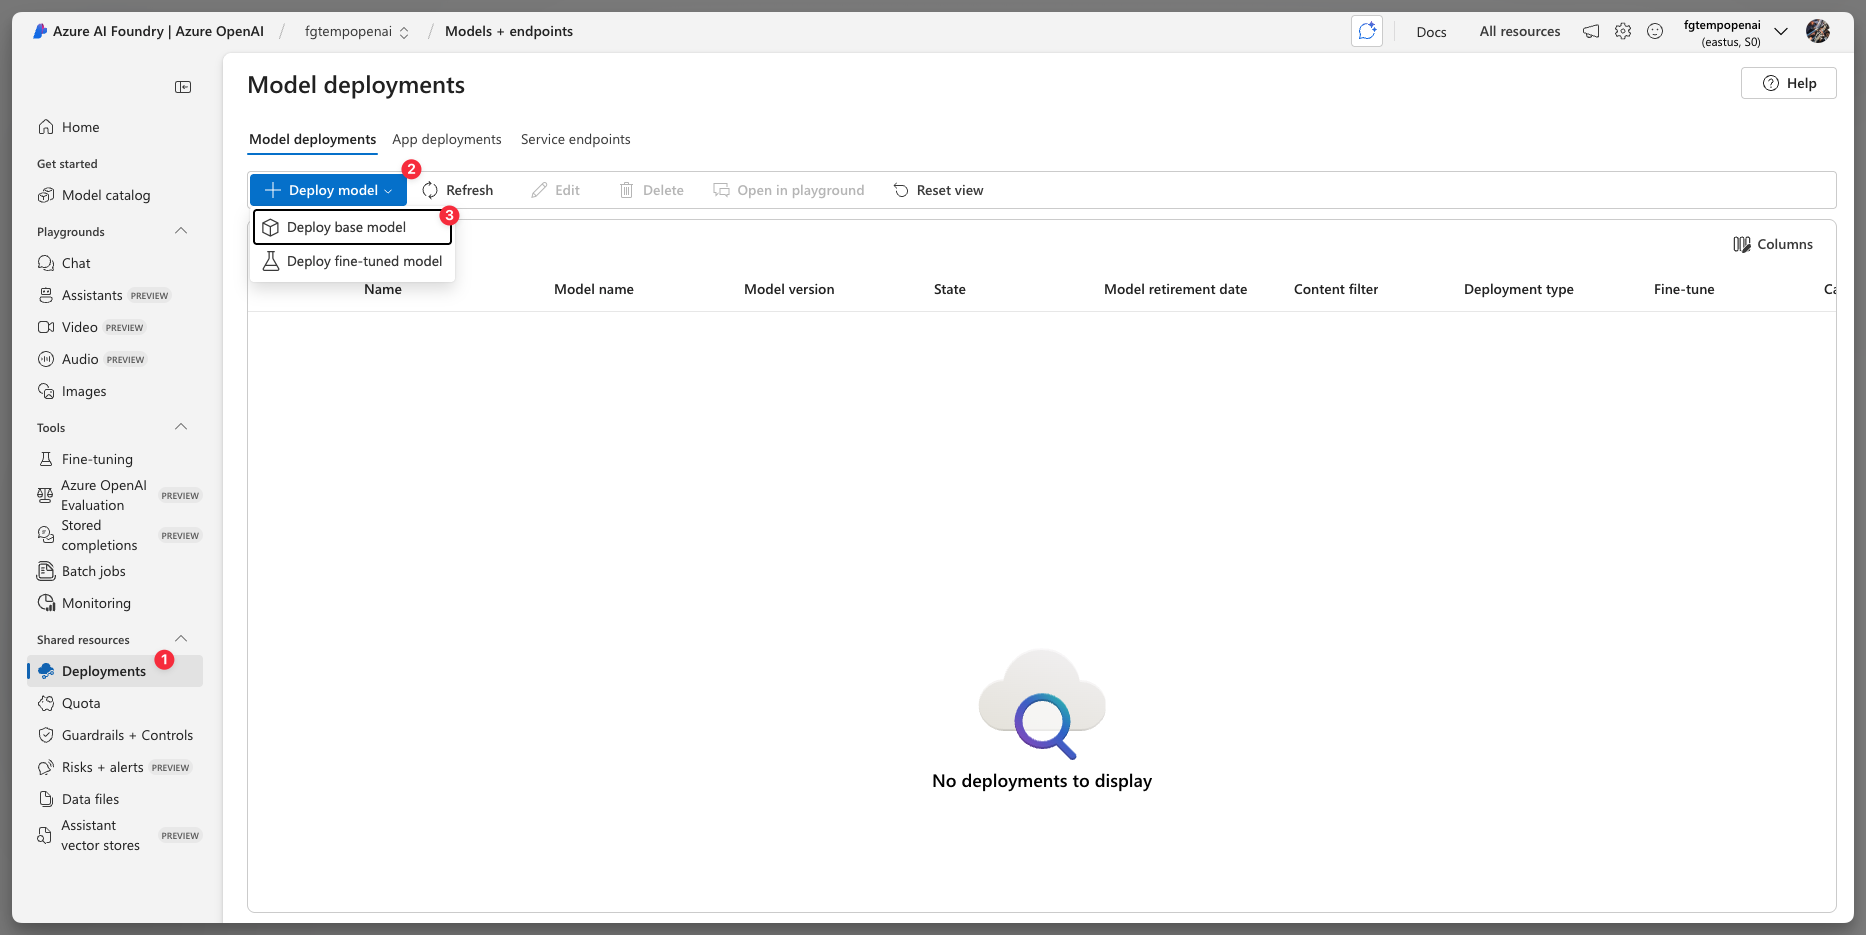
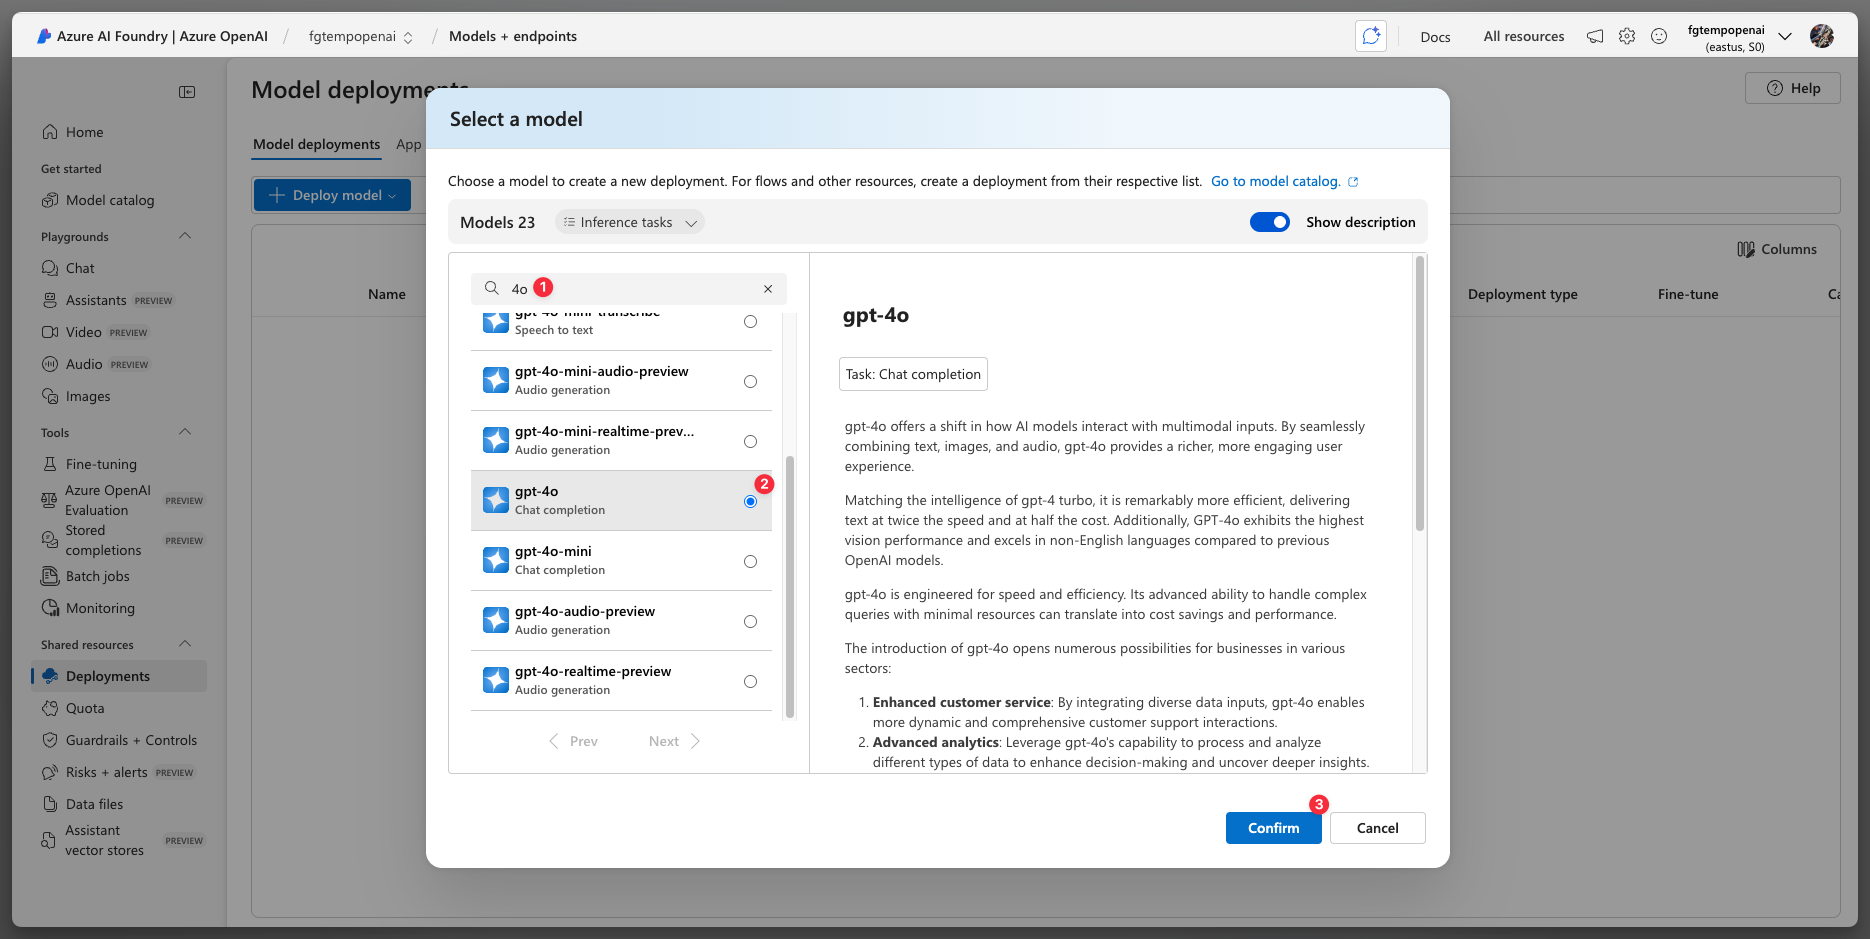
Find gpt-4o, then click confirm.
IMPORTANT: Make sure your token is at least 100k for production.
For demo purpose 50k is fine.

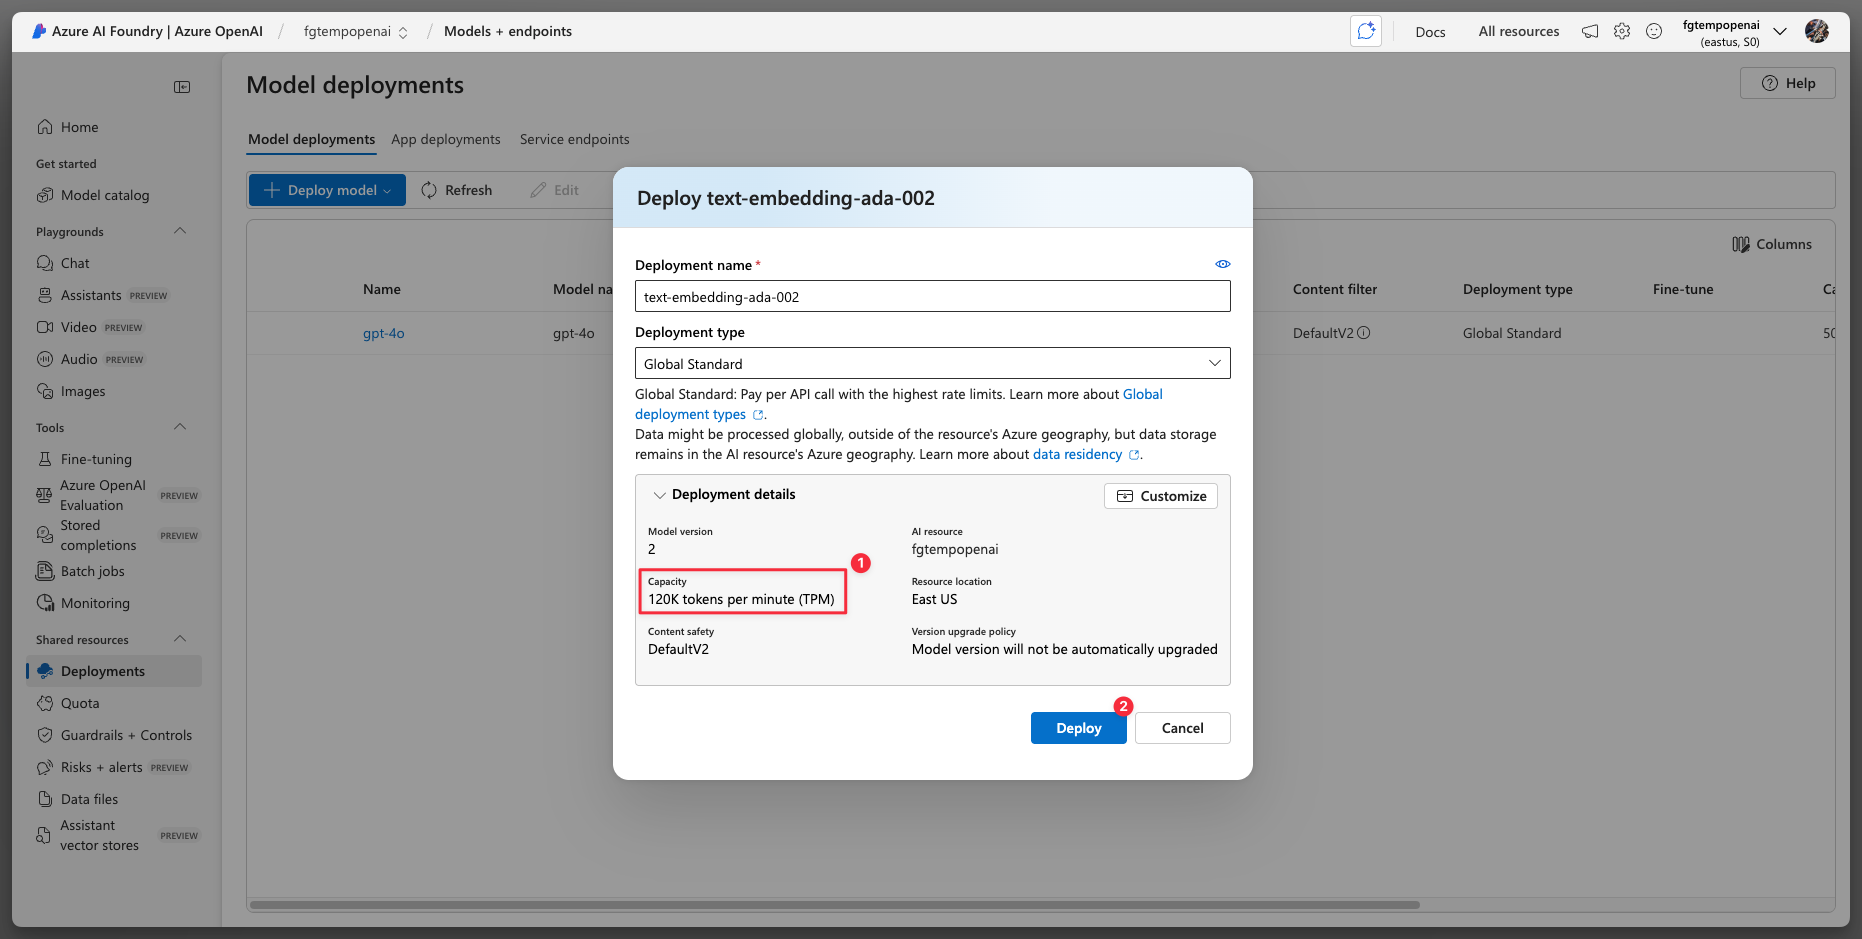
Step 7: Deploy Text Embedding Model
Click Deploy model again. This time find “text-embedding-ada-002” instead of gpt-4o. Then confirm.

Make sure you have at least 100k tokens for production. Then click the deploy button.
Step 8: Connect gpt-4o Model to Storage and Search Service
After you made 2 base model deployments (gpt-4o and text-embedding-ada-002) do the following
Click the Chat menu on the sidebar
Make sure your gpt-4o selected
Click “Add your data” dropdown
Click “Add a data source”

Select the Azure Storage and container you created in previous steps.
IMPORTANT: Make sure you select your embedding model (text-embedding-ada-002).

Leave default settings like screenshot below for Data management.

IMPORTANT: Please select API key on the Data connection. Click Next and submit and you should see the next screenshot.
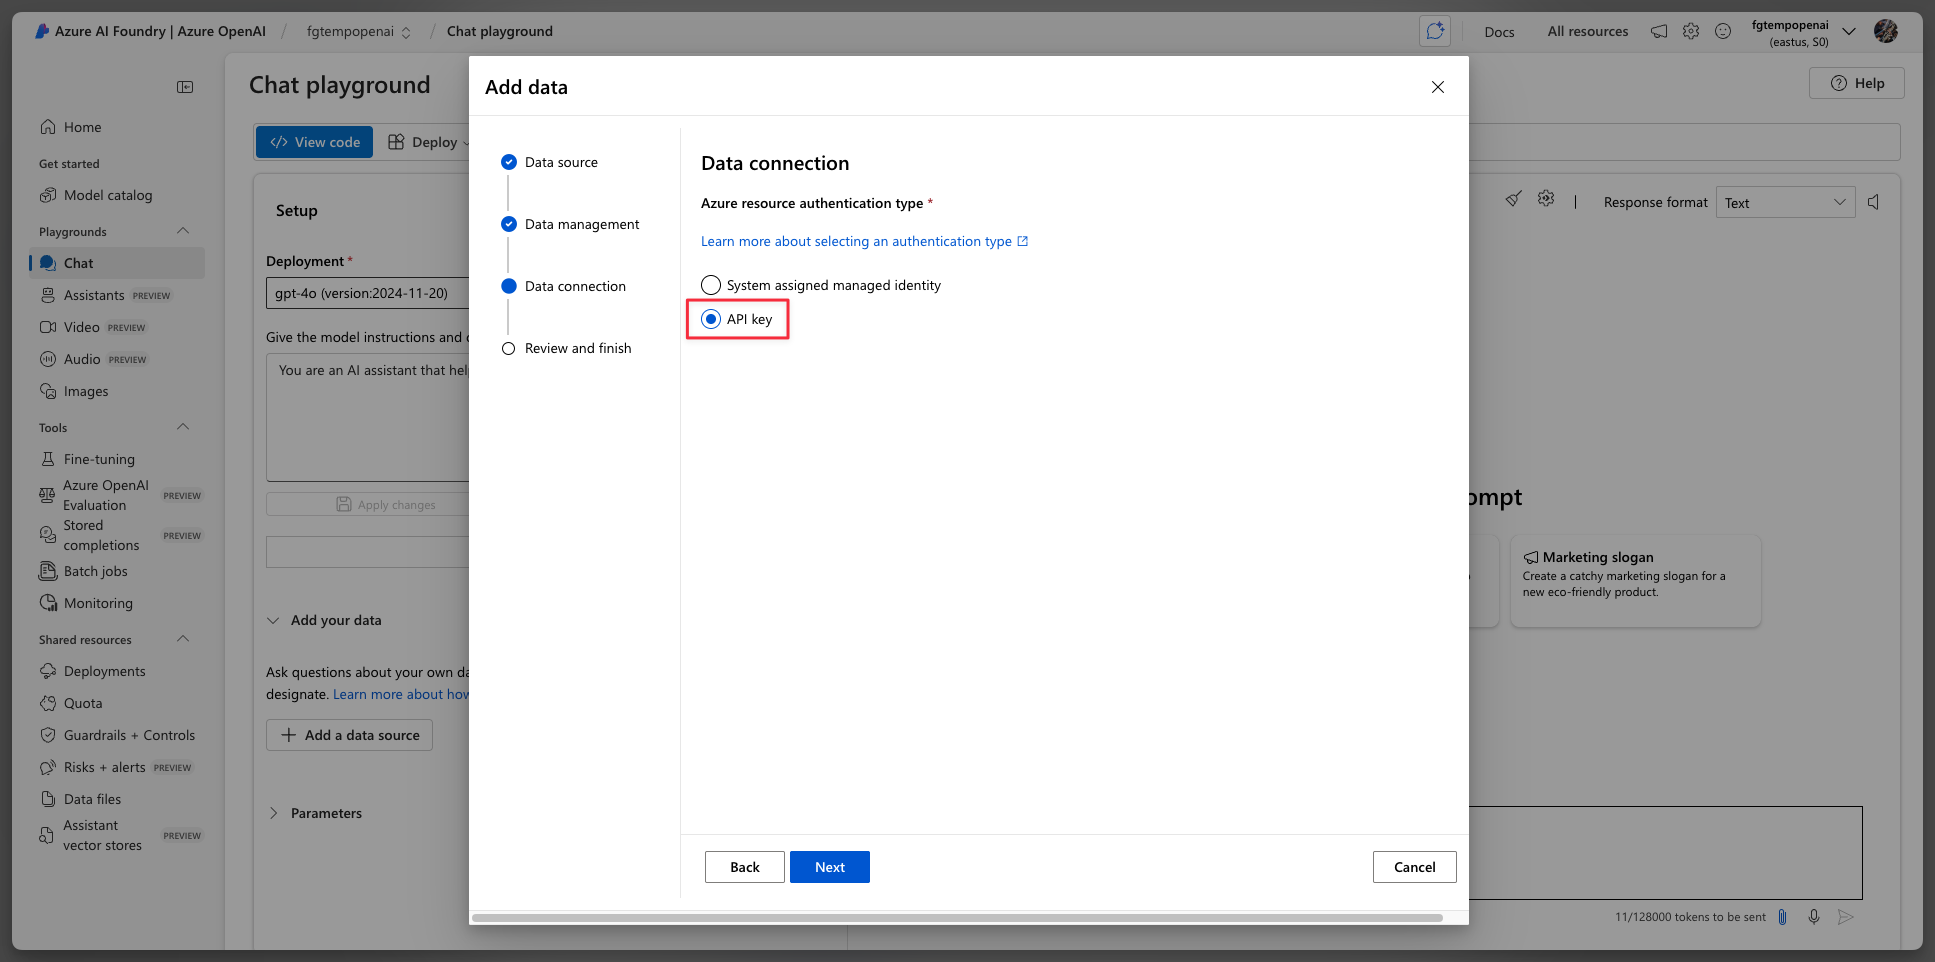
NOTE: That warning message is normal.

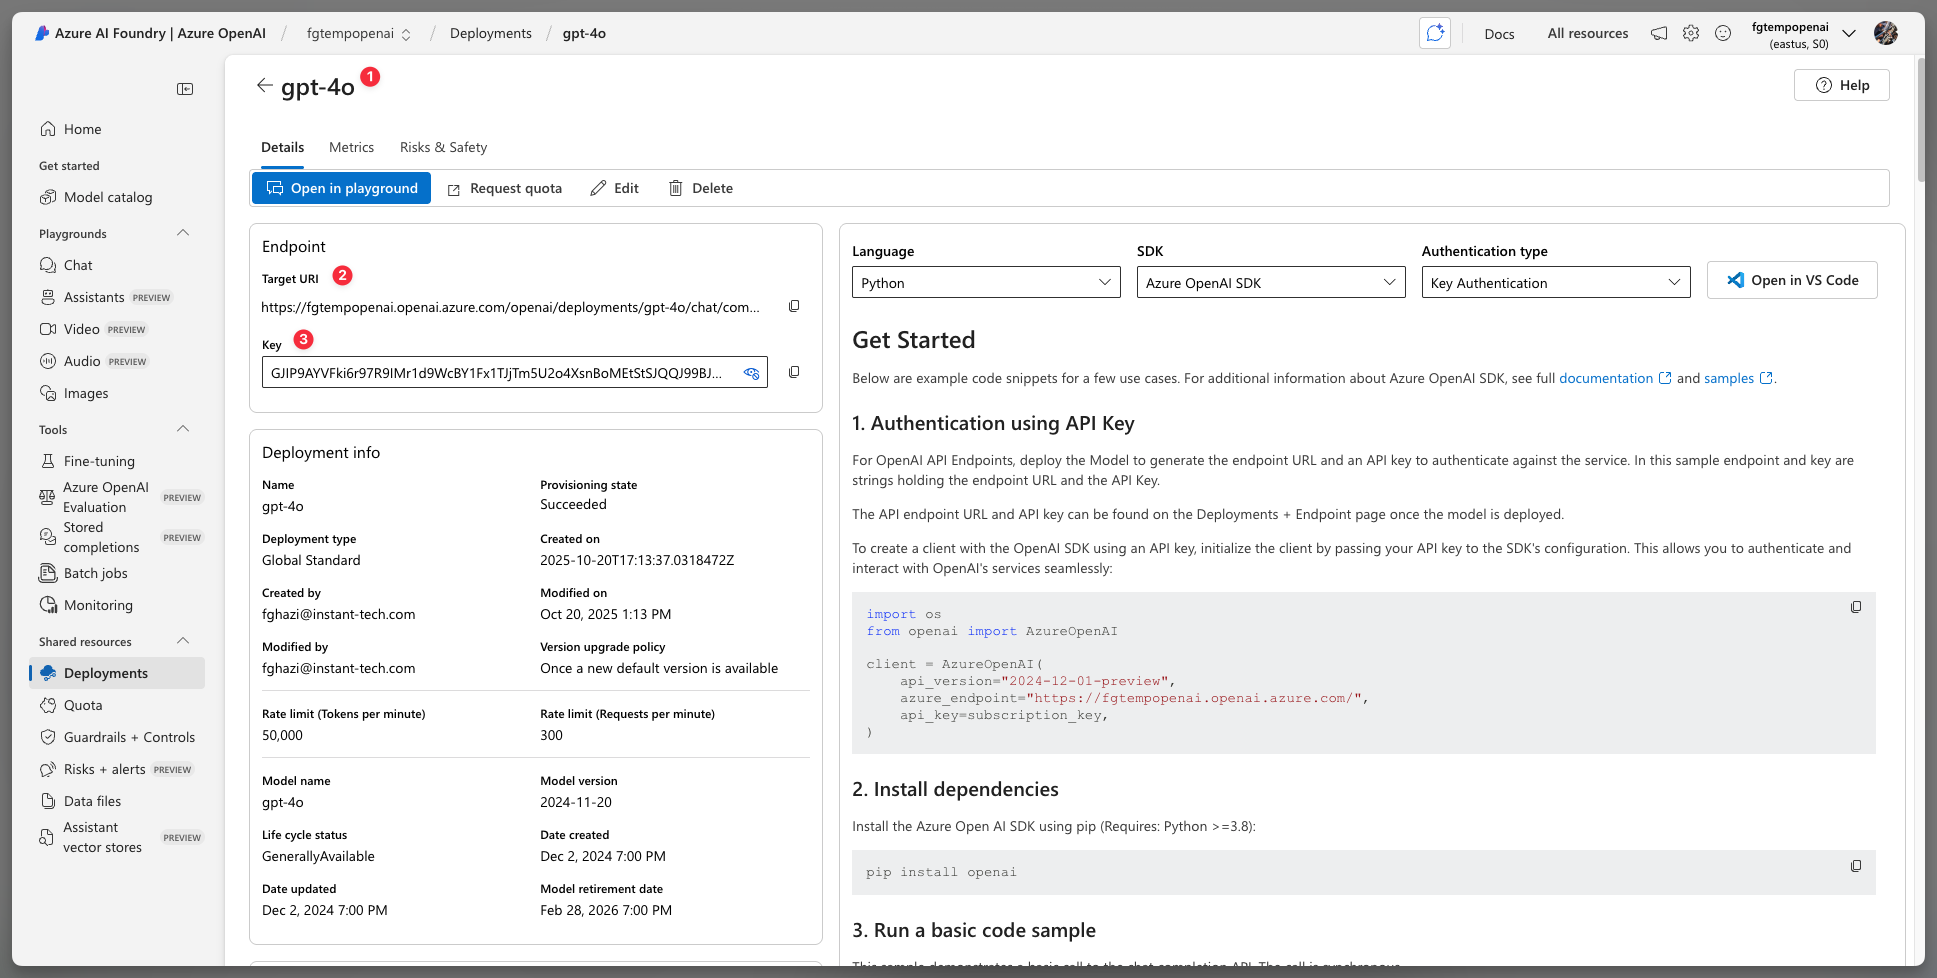
Step 9: Connect Azure OpenAI to Chime V5
From your Chime V5 admin, click Chime settings dropdown, then click Azure OpenAI Services. Disable the “Use Default Settings”. Then fill out the 3 input fields which you can copy and paste from the Azure AI Foundry Portal.

Grab the “Model Deployment Name”, the endpoint, and key from here:
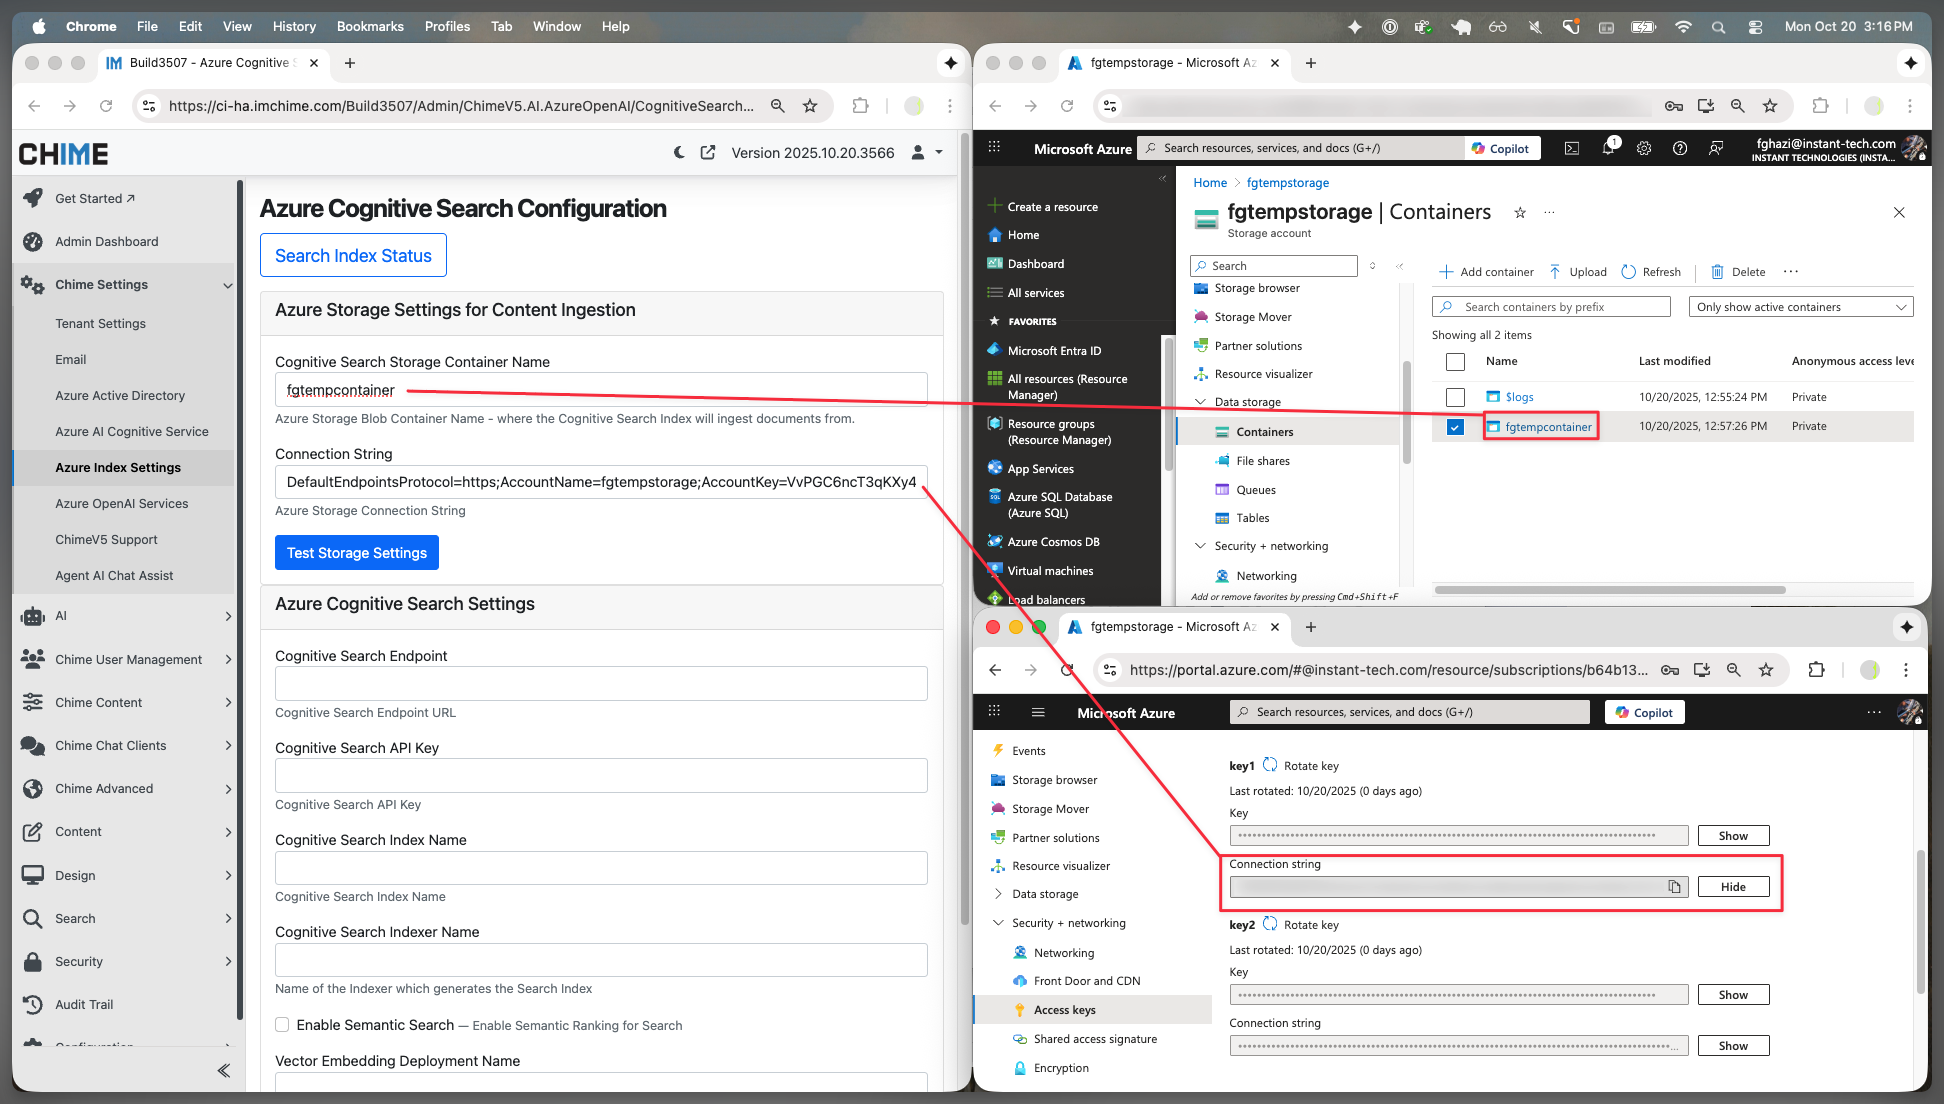
Step 10: Connect Azure Storage to Chime V5
Open Chime V5 admin, click Chime settings on the sidebar and click Azure Index Settings.

You can get container name and connection string from your Azure Storage Account resource you created from previous steps.
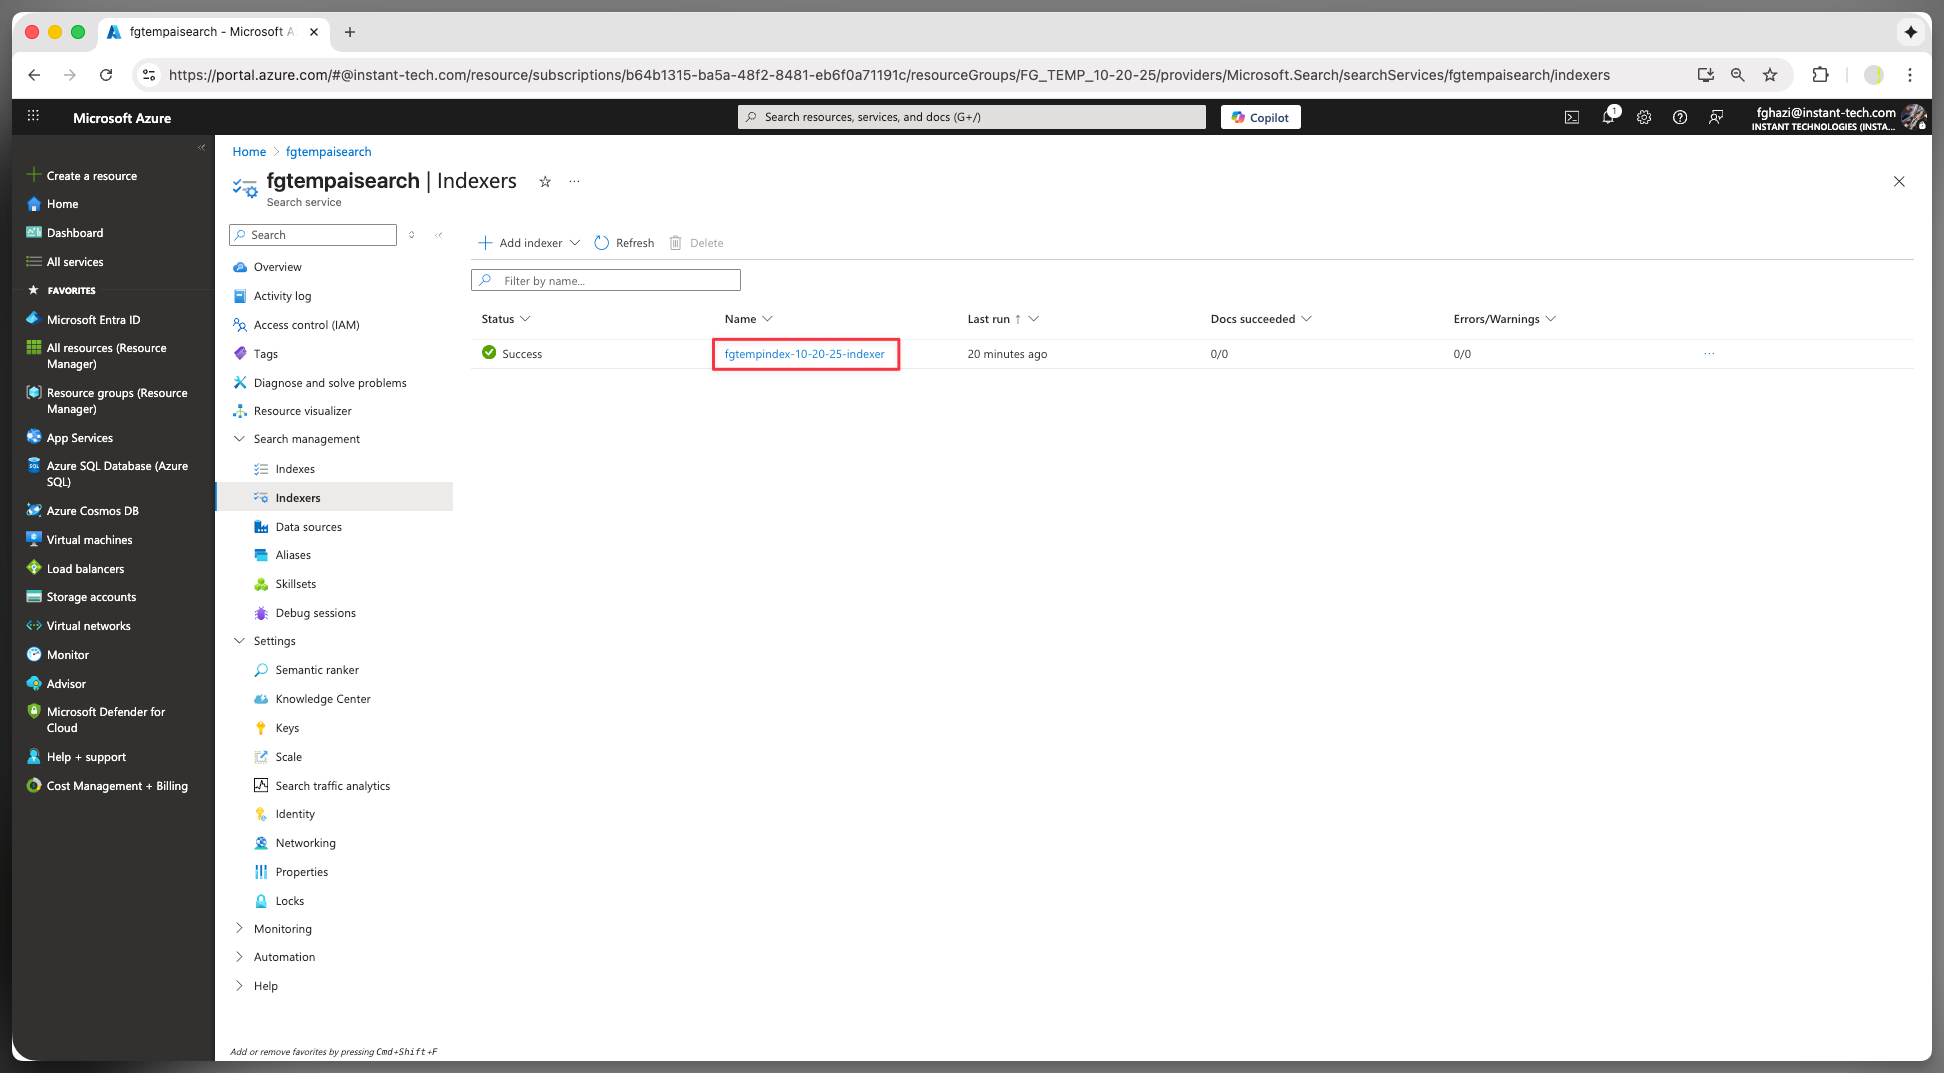
Step 11: Connect Azure AI Search Service to Chime V5
Still in the same page, fill out Chime V5 Azure Cognitive Search Settings. Click Test Index Settings and finally click Save. To get the data for each input field, see remaining screenshots

Cognitive Search Endpoint:

Cognitive Search API:
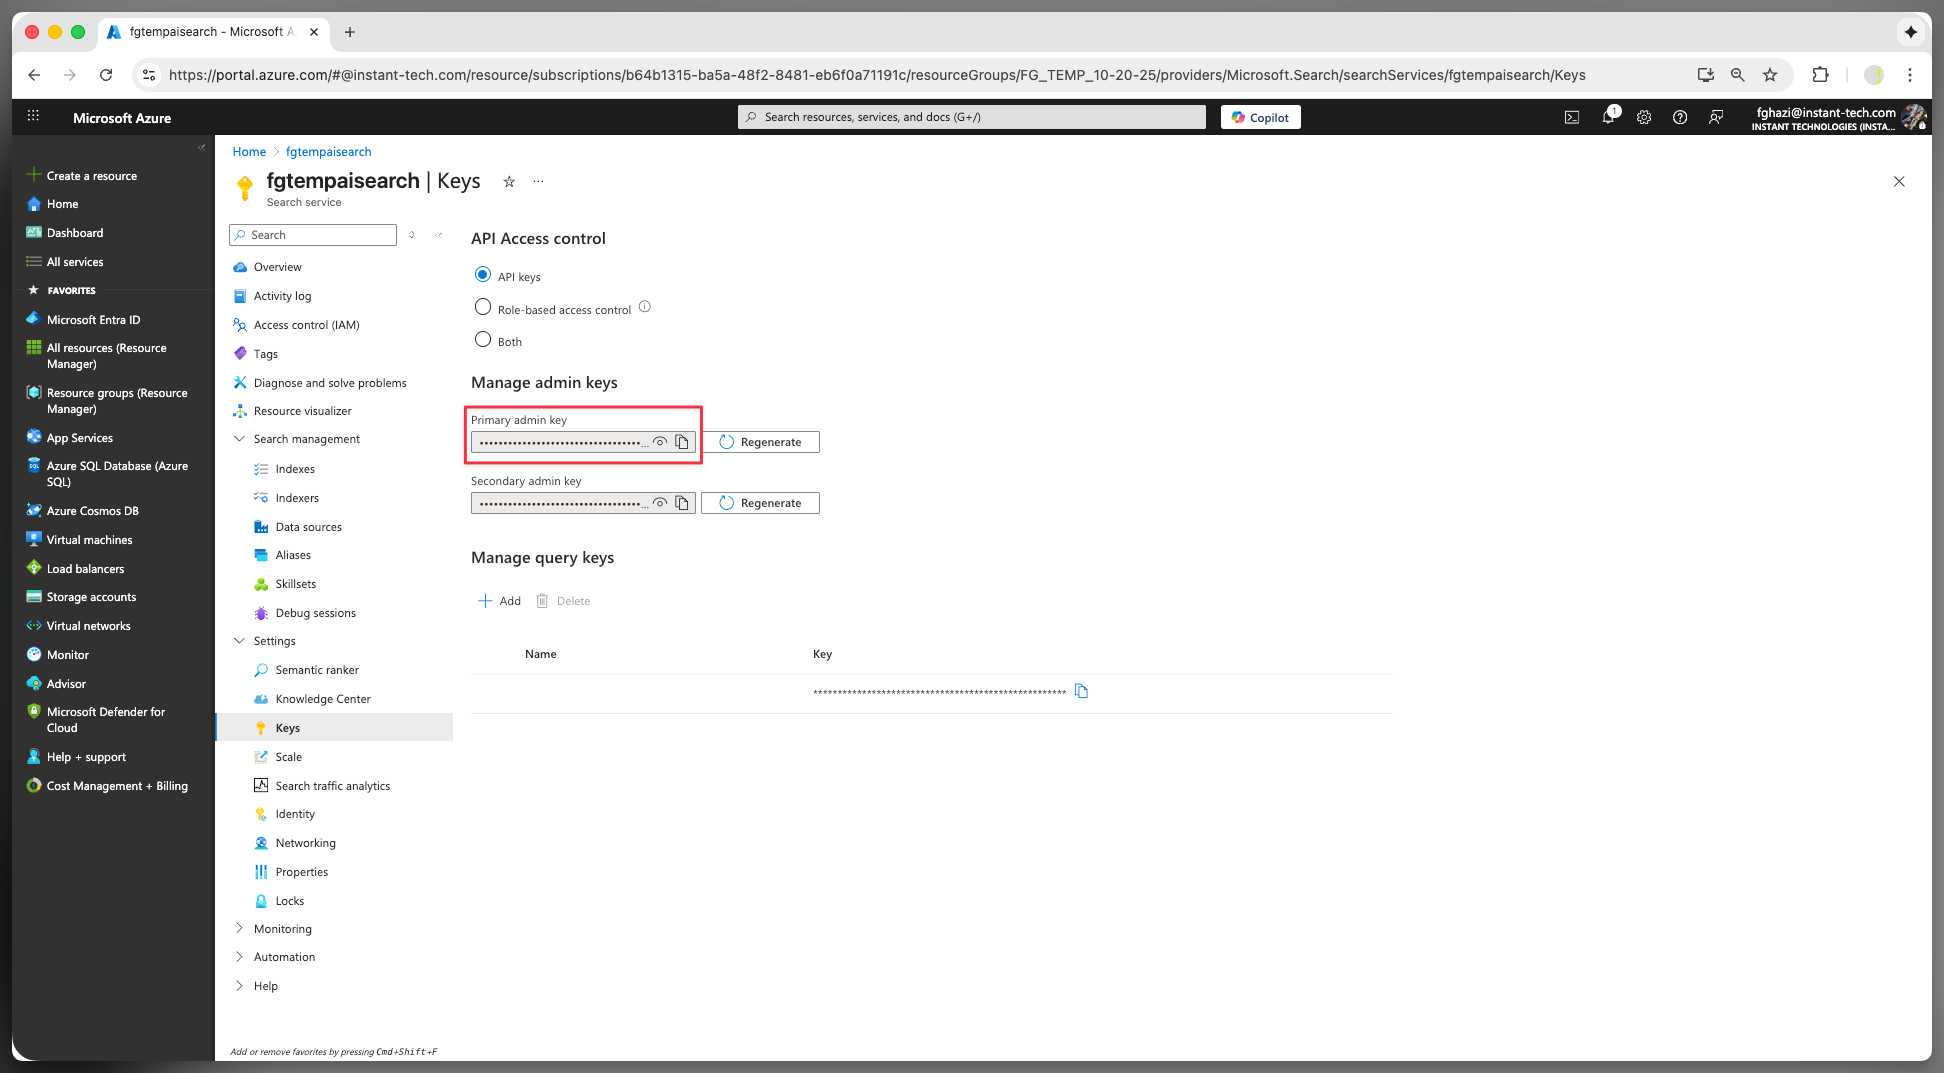
Cognitive Search Index Name:

Cognitive Search Indexer Name:
Once you complete and save these settings in Chime, you will be able to create Chime knowledge base, get those knowledge base indexed, and chat using AI you deployed.
For any questions, please email support@instant-tech.com
Simplifying Data Management with CSV Import and Lookup
The new CSV Data Import & Lookup feature in ChimeV5 enables tenants to upload CSV files and use them for real-time data lookups within chat pipelines. This empowers both AI and human agents to retrieve relevant information efficiently, enhancing customer support interactions.
Feature Overview
The ChimeV5.datalookup.csv2column feature allows:
Tenants to upload and manage CSV files for data retrieval.
Real-time lookups in chat pipelines to fetch relevant information based on user queries.
Enhanced session-based metadata storage for tracking account details.
Features Page: Data Lookup CSV2Column

The new Data Lookup CSV2Column page in the Admin menu provides an interface for managing CSV file uploads, deletions, and updates. This is the first step in enabling CSV-based lookups in chat pipelines.
Admin Configuration: Managing CSV Files
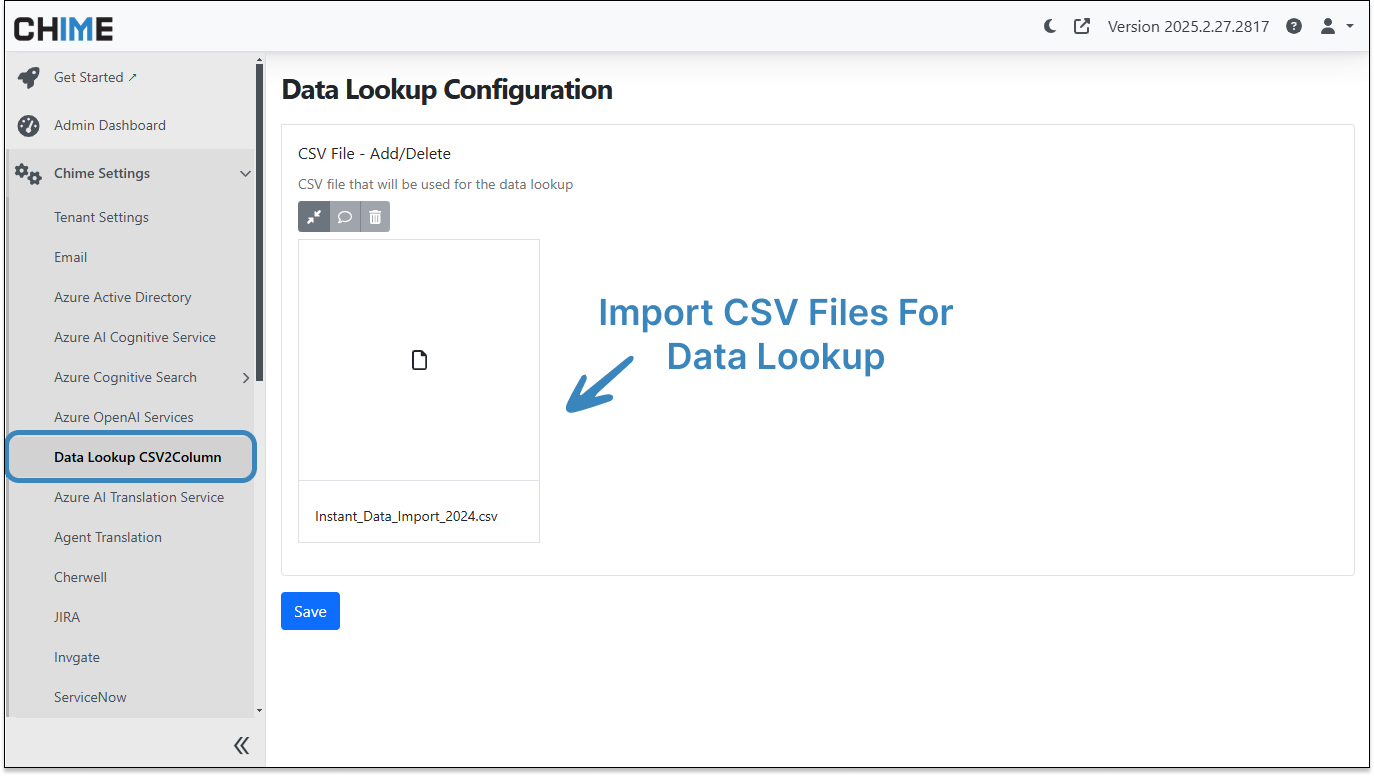
Administrators can navigate to the Data Lookup Configuration page to:
Upload a new CSV file for lookups.
Delete or replace an existing CSV file.
Once uploaded, the CSV file becomes available for use in chat pipeline lookups.
Pipeline Configuration: Using JavaScript for Lookups
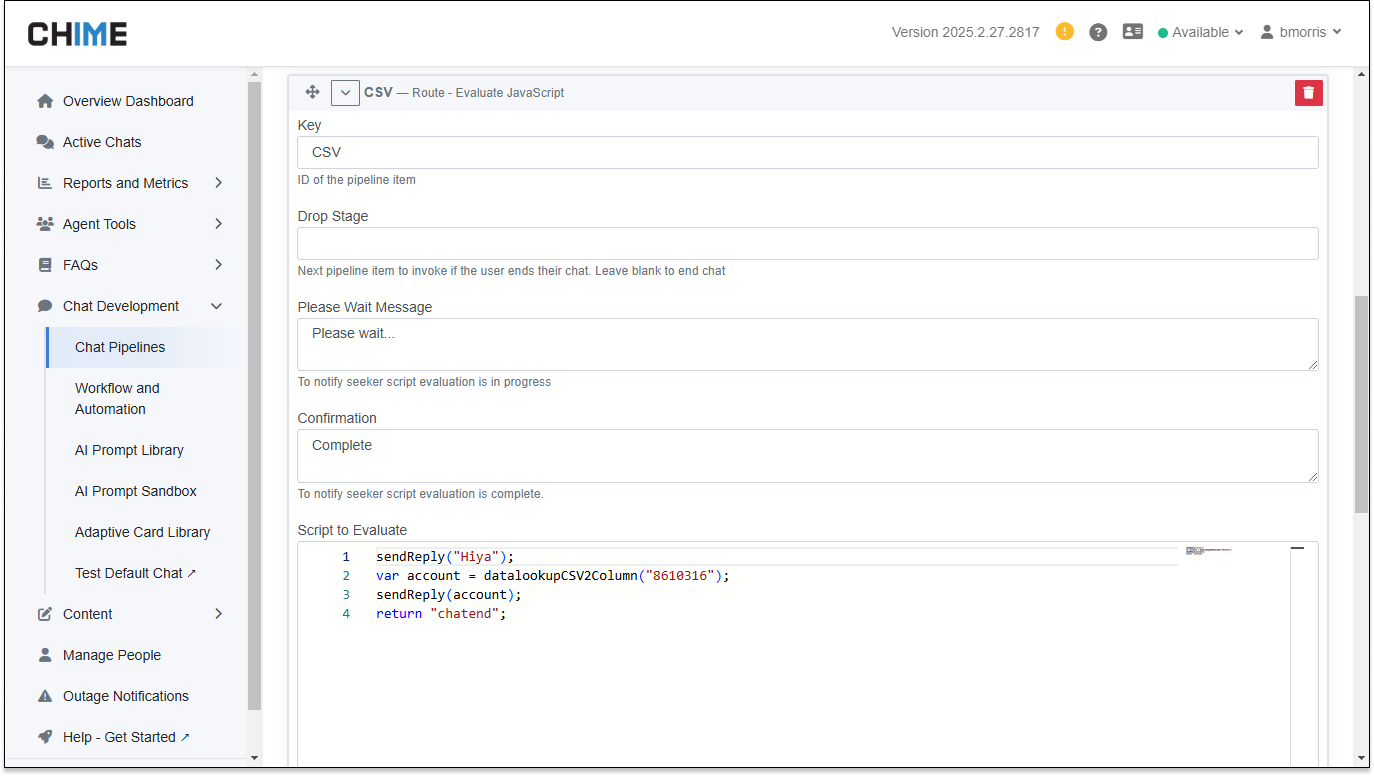
To enable CSV lookups in a chat pipeline, configure a JavaScript activity within the pipeline. The new datalookupCSV2Column method allows retrieving account details based on a unique identifier.
JavaScript Function Usage
var account = datalookupCSV2Column("accountNumber");
datalookupCSV2Column(accountNumber): Fetches account details from the uploaded CSV file.
Metadata Variables in Data Lookup
When retrieving data, the following metadata values are used to store information within the session:
Guest.AccountNumber – Stores the retrieved account number.
Guest.AccountName – Stores the associated account name.
Guest.AccountResponsible – Tracks the responsible contact for the account.
These metadata values ensure that retrieved information is accessible throughout the chat session.
Guest Web Client: Using the Data Lookup Script

To integrate the CSV lookup functionality within the guest web client, use the following JavaScript snippet:
var accountNumber = "12345"; // Example account number
var account = datalookupCSV2Column(accountNumber);
This script retrieves the account details for a given account number.
Conclusion
The new CSV Data Import & Lookup feature in ChimeV5 provides a powerful way to integrate external data into chat interactions. By enabling tenants to upload CSV files and perform real-time lookups, this feature enhances both AI-driven and human-assisted support workflows, improving efficiency and customer satisfaction.
Administrators should explore the Data Lookup CSV2Column feature to configure and manage CSV files, while developers can leverage JavaScript methods to integrate lookups seamlessly into their chat pipelines.
Fine-Tuning AI Interactions: The Power of the AI Prompt Test Sandbox
The AI Prompt Test Sandbox is an essential tool for refining and optimizing AI-generated responses within a controlled environment. Whether you're developing AI-driven chatbots or fine-tuning existing AI prompts, the test sandbox offers a robust set of features that empower developers and managers to improve AI interactions effectively. In this article, we'll explore the functionality, usage, and key features of the AI Prompt Test Sandbox.
Accessing the AI Prompt Test Sandbox
To begin using the AI Prompt Test Sandbox, follow these steps:
- Navigate to the Manager Dashboard.
- Open the AI Prompt Library under the Chat Development dropdown menu.
- Select the Test Prompt button for one of the listed AI Prompts to launch the sandbox environment.
Once inside the sandbox, users can experiment with different prompts, fine-tune response settings, and enable advanced features to enhance AI-generated replies.
Key Features of the AI Prompt Test Sandbox
The AI Prompt Test Sandbox provides several advanced features that allow users to customize the AI’s response behavior:
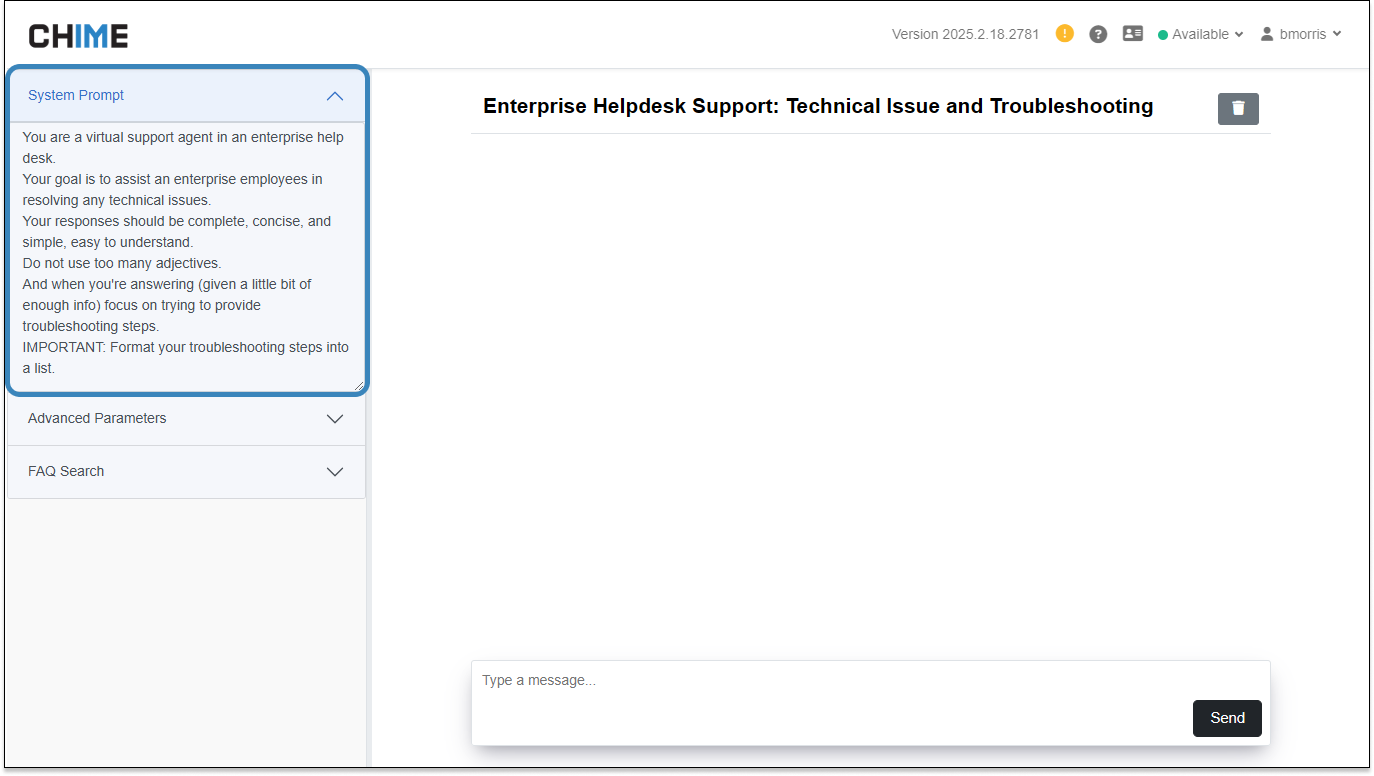
AI Prompt Customization
Users can modify the AI prompt to fine-tune the AI's response style, tone, and contextual understanding. Adjusting the system prompt ensures that responses align with the intended user experience.
Advanced Parameters
Users have the ability to set AI response parameters, such as:
- Max Tokens: Limits the response length.
- Temperature: Controls randomness in responses.
- Top-P (Nucleus Sampling): Adjusts response diversity.
- Frequency & Presence Penalties: Regulate repetition and encourage fresh content generation.

FAQ Search Integration
For AI chatbots utilizing indexed FAQs, the sandbox provides a cognitive search feature that enables the AI to reference and retrieve relevant FAQ information. When enabled, this feature ensures that chatbot responses include:
- Referenced FAQs that provide authoritative answers.
- Contextual snippet dropdowns displaying source content


Benefits of Using the AI Prompt Test Sandbox
- Real-time Testing: Instantly view how changes to prompts and parameters affect AI responses.
- Enhanced Accuracy: Improve chatbot interactions by aligning responses with predefined knowledge bases.
- Customization & Flexibility: Experiment with multiple configurations to determine optimal AI behavior.
- User-Friendly Interface: A straightforward UI that facilitates efficient testing and refinement.
From Chatbots to Ticketing: Expand Your Capabilities With JavaScript Integration
The Script Choice, or Evaluate JavaScript pipeline activity evaluates custom JavaScript, and can be inserted anywhere in a pipeline.
Chime V5 JavaScript Methods
sendReply(msg)
This method sends a chat message to the guest.
Example:
// Send a message to the guest
sendReply('Hello, how can I assist you today?');
Response: The message is sent to the guest.
Use Case: Communicate with the guest during a session.
updateSessionMetaData(key, value)
This method updates or adds session metadata properties.
Example:
// Update session metadata
updateSessionMetaData('Guest.Email', 'John.Doe@example.com');
// All of a sessions metadata properties can be accessed through JavaScript using the following format:
sessionMetaData.<Metadata Variable>
Response: Session metadata is updated or added with the specified key-value pair.
Use Case: Store or update session-specific metadata for better tracking or handling.
Note: Additional Metadata information can be found in the Metadata section below
Azure Graph Methods
getUser(emailAddress) : userObject
This method retrieves a user object by email address.
Example:
// Retrieve user details
var user = getUser('user@domain.com');
sendReply("User Name: " + user.name + ", Role: " + user.role);
Response: The user object with details is retrieved.
getUserOfficeLocation(emailAddress) : string
This method retrieves the office location of a user by their email address.
Example:
// Retrieve user office location
var location = getUserOfficeLocation('user@domain.com');
sendReply("User Office Location: " + location);
Response: The office location of the specified user is retrieved.
createMeetingWithJoinUrl() : meetingObject
This method creates a meeting and generates a join URL.
Example:
// Create a meeting with a join URL
var meeting = createMeetingWithJoinUrl();
sendReply("Meeting URL: " + meeting.url);
Response: A meeting is created, and the join URL is returned.
getADUserObject (emailAddress) : userObject
This method retrieves a specified user object or performs a search to get multiple user objects.
Example:
// Retrieve a specific AD user object
var userObject = getADUserObject(sessionMetadata.Guest.Email);
var userDetails = JSON.parse(userObject);

// Access user properties
sendReply("User Display Name: " + userDetails.DisplayName + ", Email: " + sessionMetaData.Guest.Email);
Response: JSON object with user details.
Use Case: Retrieve details for a specific user or search for multiple user objects.
Chat GPT Methods
runPrompt (sessionId, prompt) : string
This method processes a prompt through ChatGPT and returns a response based on the specified rules.
Example:
// Run a prompt through ChatGPT
var result = runPrompt(sessionMetaData.Session.SessionId,
    "If there is no message from the user yet, then respond with \"getQuestion\"\n" +
    "If the user's question is about printers, then respond with \"printers\"\n" +
    "If the user's question is about email, then respond with \"email\"\n" +
    "Otherwise, respond with \"otherProblem\"");

// Handle the response
sendReply("ChatGPT Response: " + result);
Response: A string value indicating the response based on the rules provided in the prompt.
summarizeConversation(sessionId) : JSON
This method summarizes a conversation based on the provided session ID.
Example:
// Summarize the conversation
let sessionId = "${Session.SessionId}";
let summary = summarizeConversation(sessionId);

// Access summary details
sendReply(summary.SummaryTitle);
sendReply(summary.Issue);
sendReply(summary.Narrative);
sendReply(summary.Resolution);
Response: A JSON object containing the conversation summary, including the title, issue, narrative, and resolution, is returned.
FAQ Methods
getFAQTags() : string[]
This method retrieves all available FAQ tags.
Example:
// Retrieve FAQ tags
var tags = getFAQTags();
sendReply("Available tags: " + tags.join(', '));
Response: A list of FAQ tags is retrieved.
searchFAQByTag(tag) : FAQ[]
This method searches FAQs by a specific tag.
Example:
// Search FAQs by tag
var faqs = searchFAQByTag('network-issues');
sendReply("FAQs found: " + faqs.length);
faqs.forEach(faqRecord => {
    sendReply("Id: " + faqRecord.ContentItemId + ", displayText: " +  faqRecord.displayText + " PublishedUtc: " + faqRecord.PublishedUtc);
});
Response: A list of FAQs matching the specified tag is returned.
searchFAQByTitleKeywords(keywords) : FAQ[]
This method searches FAQs by title keywords.
Example:
// Search FAQs by title keywords
var faqs = searchFAQByTitleKeywords('connectivity');
sendReply("FAQs found: " + faqs.length);
faqs.forEach(faqRecord => {
    sendReply("Id: " + faqRecord.ContentItemId + ", displayText: " +  faqRecord.displayText + " PublishedUtc: " + faqRecord.PublishedUtc);
});
Response: A list of FAQs matching the title keywords is returned.
Ticketing Methods
Cherwell Ticketing Methods
getCherwellTickets('seekerEmailAddress') : JSONArray[]
Example:
// Get tickets
var tickets = getCherwellTickets("${Guest.Email}");
var ticketsArray = JSON.parse(tickets);
sendReply("Count of tickets: " + ticketsArray.length);
Response: JSON array of ticket details.
Use Case: Retrieve all tickets related to a specific email.
updateCherwellTicketDescription(ticketNumber, updatedDescription) : JSON
Example:
var ticketObject = updateCherwellTicketDescription('00070', 'Please engage network team');
var ticketDetails = JSON.parse(ticketObject);

// Access ticket properties
sendReply("Ticket Id: " + ticketDetails.Id + ", URL: " + ticketDetails.URL);
Response: Updated ticket object with ticket properties: Id, Number, TicketState, URL Use Case: Update the description of an existing ticket.
assignCherwellTicket(ticketNumber, agentEmailAddress) : JSON
Example:
var ticketObject = assignCherwellTicket('00070', 'agent@domain');
var ticketDetails = JSON.parse(ticketObject);

// Access ticket properties
sendReply("Ticket Id: " + ticketDetails.Id + ", URL: " + ticketDetails.URL);
Response: Updated ticket object with ticket properties: Id, Number, TicketState, URL Use Case: Assign a ticket to a specific agent.
JIRA Ticketing Methods
getJIRATickets('seekerEmailAddress') : JSONArray[]
Example:
// Get tickets
var tickets = getJIRATickets("${Guest.Email}");
var ticketsArray = JSON.parse(tickets);
sendReply("Count of tickets: " + ticketsArray.length);
Response: JSON array of ticket details.
Use Case: Retrieve tickets associated with an email address.
createJIRATicket(seekerEmailAddress, agentEmailAddress, title, description, project) : JSON
Example:
var ticketObject = createJIRATicket('seeker@domain', 'agent@domain', 'Incident Title', 'Incident Description', 'project');
var ticketDetails = JSON.parse(ticketObject);

// Access ticket properties
sendReply("Ticket Id: " + ticketDetails.Id + ", URL: " + ticketDetails.URL);
Response: JSON object with ticket details.
Use Case: Create a new ticket.
updateJIRATicketTitle(ticketId, updatedTitle) : JSON
Example:
var ticketObject = updateJIRATicketTitle('00070', 'WiFi issue at NYC hub');
var ticketDetails = JSON.parse(ticketObject);

// Access ticket properties
sendReply("Ticket Id: " + ticketDetails.Id + ", URL: " + ticketDetails.URL);
Response: Updated ticket object with ticket properties: Id, Number, TicketState, URL Use Case: Update the title of a ticket.
ServiceNow Ticketing Methods
getServiceNowTickets('seekerEmailAddress') : JSONArray[]
Example:
// Get tickets
var tickets = getServiceNowTickets("${Guest.Email}");
var ticketsArray = JSON.parse(tickets);
sendReply("Count of tickets: " + ticketsArray.length);
Response: JSON array of ticket details.
Use Case: Retrieve tickets associated with an email.
createServiceNowTicket('ticketJSON') : JSON
Example:
var ticket = {
    state: '0',
    short_description: 'Short Question',
    description: 'Full Question',
    caller_id: 'webvisitor@example.com',
    assigned_to: 'admin@example.com',
    work_notes: 'chat transcript'
};
var result = createServiceNowTicket(JSON.stringify(ticket));
Response: JSON object with ticket details.
Use Case: Create a new ticket.
updateServiceNowTicket('ticketJSON', ticketId) : JSON
Example:
var ticket = {
    short_description: 'Updated Short Question',
    description: 'Updated Full Question',
    work_notes: 'Updated chat transcript'
};
var ticketObject = updateServiceNowTicket(JSON.stringify(ticket), '<ticketId>');
var ticketDetails = JSON.parse(ticketObject);

// Access ticket properties
sendReply("Ticket Id: " + ticketDetails.Id + ", URL: " + ticketDetails.URL);
Response: JSON object with updated ticket details.
Use Case: Update an existing ticket.
SolarWinds Ticketing Methods
getSolarwindsTickets('seekerEmailAddress') : JSONArray[]
Example:
// Get tickets
var tickets = getSolarwindsTickets("${Guest.Email}");
var ticketsArray = JSON.parse(tickets);
sendReply("Count of tickets: " + ticketsArray.length);
Response: JSON array of ticket details.
Use Case: Retrieve tickets based on a specific email.
createSolarwindsTicket(seekerEmailAddress, agentEmailAddress, title, description) : JSON
Example:
var result = createSolarwindsTicket('seeker@domain', 'agent@domain', 'Request for new laptop', 'Current laptop has reached end of life');Response: JSON object with ticket details.
Use Case: Create a new SolarWinds ticket.
updateSolarwindsTicketDescription(ticketId, updatedDescription) : JSON
Example:
var ticketObject = updateSolarwindsTicketDescription('00070', 'Please engage network team');
var ticketDetails = JSON.parse(ticketObject);

// Access ticket properties
sendReply("Ticket Id: " + ticketDetails.Id + ", URL: " + ticketDetails.URL);
Response: Updated ticket object with ticket properties: Id, Number, TicketState, URL
Use Case: Modify ticket description.
assignSolarwindsTicket(ticketId, agentEmailAddress) : JSON
Example:
var ticketObject = assignSolarwindsTicket('00070', 'agent@domain');
var ticketDetails = JSON.parse(ticketObject);

// Access ticket properties
sendReply("Ticket Id: " + ticketDetails.Id + ", URL: " + ticketDetails.URL);
Response: Updated ticket object with ticket properties: Id, Number, TicketState, URL
Use Case: Assign a ticket to a specific agent.
addCommentsToSolarwindsTicket(sessionMetaData.Ticket.Id, summary, false)
This method generates a session comments based on the provided session metadata.
Example:
// Generate the session summary
let summary = "VTB Session Summary (AI Generated)\n\n";
summary += "AI Issue Title\n";
summary += sessionMetaData.AI.Summary.Title + "\n\n";

summary += "AI Issue Description\n";
summary += sessionMetaData.AI.Summary.Issue + "\n\n";

summary += "AI Narrative\n";
summary += sessionMetaData.AI.Summary.Narrative + "\n\n";

summary += "AI Resolution\n";
summary += sessionMetaData.AI.Summary.Resolution + "\n\n";

// Add the summary as comments to the ticket
addCommentsToSolarwindsTicket(sessionMetaData.Ticket.Id, summary, false);
Response: The session summary string is generated and added to the SolarWinds ticket.
Invgate Ticketing Methods
getInvgateTickets('seekerEmailAddress') : JSONArray[]
Example:
// Get tickets
var tickets = getInvgateTickets("${Guest.Email}");
var ticketsArray = JSON.parse(tickets);

// Perform operations on ticket records
sendReply("Count of tickets: " + ticketsArray.length);
Response: JSON array of ticket details.
Use Case: Retrieve a list of Invgate tickets associated with a specific email address.
updateInvgateTicketDescription(ticketId, description) : JSON
Example:
// Update ticket description
var ticketObject = updateInvgateTicketDescription('00070', 'Please escalate to the IT team for further analysis.');
var ticketDetails = JSON.parse(ticketObject);

// Access ticket properties
sendReply("Ticket Id: " + ticketDetails.Id + ", URL: " + ticketDetails.URL);
Response: Updated ticket object with ticket properties: Id, Number, TicketState, URL
Use Case: Update the description of a ticket.
assignInvgateTicket(agentEmailAddress) : JSON
Example:
// Assign ticket to an agent
var ticketObject = assignInvgateTicket('agent@domain');
var ticketDetails = JSON.parse(ticketObject);

// Access ticket properties
sendReply("Ticket Id: " + ticketDetails.Id + ", URL: " + ticketDetails.URL);
Response: Updated ticket object with ticket properties: Id, Number, TicketState, URL
Use Case: Assign a ticket to a specific agent.
updateInvgateTicketTitle(ticketId, title) : JSON
Example:
// Update ticket title
var ticketObject = updateInvgateTicketTitle('00070', 'Network Issue: Unable to Connect');
var ticketDetails = JSON.parse(ticketObject);

// Access ticket properties
sendReply("Ticket Id: " + ticketDetails.Id + ", URL: " + ticketDetails.URL);
Response: Updated ticket object with ticket properties: Id, Number, TicketState, URL
Use Case: Update the title of a ticket.
Deflection Methods
markDeflected(isDeflected)
This method marks the conversation as deflected based on a boolean value.
Example:
// Mark the conversation as deflected
markDeflected(true);
Response: The conversation is marked as deflected. The call sets the following Metadata values:
- Session.Deflected = true
- Session.State = "Deflected"
markDeflectedByCustom(reason)
This method marks the conversation as deflected with a custom reason.
Example:
// Mark the conversation as deflected with a custom reason
markDeflectedByCustom('Resolved through knowledge base lookup');
Response: The conversation is marked as deflected with the specified reason.The call sets the following Metadata values:
- Session.Deflected = true
- Session.DeflectedBy = reason
- Session.State = "Deflected"
markDeflectedByFaqLookup()
This method marks the conversation as deflected after an FAQ lookup.
Example:
// Mark the conversation as deflected by FAQ lookup
markDeflectedByFaqLookup();
Response: The conversation is marked as deflected due to an FAQ lookup.The call sets the following Metadata values:
- Session.Deflected = true
- Session.DeflectedBy = "FAQLookup
- Session.State = "Deflected"
markDeflectedByTicketListing()
This method marks the conversation as deflected after a ticket listing.
Example:
// Mark the conversation as deflected by ticket listing
markDeflectedByTicketListing();
Response: The conversation is marked as deflected due to a ticket listing.The call sets the following Metadata values:
- Session.Deflected = true
- Session.DeflectedBy = "ShowTickets"
- Session.State = "Deflected"
markDeflectedByOutageDisplay()
This method marks the conversation as deflected due to an outage display.
Example:
// Mark the conversation as deflected by outage display
markDeflectedByOutageDisplay();
Response: The conversation is marked as deflected due to an outage display.The call sets the following Metadata values:
- Session.Deflected = true
- Session.DeflectedBy = "Outage"
- Session.State = "Deflected"
markDeflectedByAIAssist()
This method marks the conversation as deflected by AI assistance.
Example:
// Mark the conversation as deflected by AI assistance
markDeflectedByAIAssist();
Response: The conversation is marked as deflected due to AI assistance.The call sets the following Metadata values:
- Session.Deflected = true
- Session.DeflectedBy = AI Assist
- Session.State = "Deflected"
markDeflectedByOffHours()
This method marks the conversation as deflected during off-hours.
Example:
// Mark the conversation as deflected during off-hours
markDeflectedByOffHours();
Response: The conversation is marked as deflected due to off-hours.The call sets the following Metadata values:
- Session.Deflected = true
- Session.DeflectedBy = Off Hours
- Session.State = "Deflected"
No User Response Methods
noUserResponseCustomReason(reason)
This method indicates no user response with a custom reason.
Example:
// Log no user response with a custom reason
noUserResponseCustomReason('User did not engage after viewing options');
Response: The lack of user response is logged with the specified custom reason.
noUserResponseAfterFAQLookup()
This method indicates no user response after an FAQ lookup.
Example:
// Log no user response after FAQ lookup
noUserResponseAfterFAQLookup();
Response: The lack of user response after the FAQ lookup is logged.
noUserResponseAfterTicketListing()
This method indicates no user response after viewing ticket listings.
Example:
// Log no user response after viewing ticket listings
noUserResponseAfterTicketListing();
Response: The lack of user response after ticket listings is logged.
noUserResponseAfterTicketCreation()
This method indicates no user response after ticket creation.
Example:
// Log no user response after ticket creation
noUserResponseAfterTicketCreation();
Response: The lack of user response after ticket creation is logged.
noUserResponseAfterOutageDisplay()
This method indicates no user response after viewing an outage display.
Example:
// Log no user response after outage display
noUserResponseAfterOutageDisplay();
Response: The lack of user response after the outage display is logged.
noUserResponseAfterAIAssist()
This method indicates no user response after receiving AI assistance.
Example:
// Log no user response after AI assistance
noUserResponseAfterAIAssist();
Response: The lack of user response after AI assistance is logged.
noUserResponseAfterFeedbackCard()
This method indicates no user response after displaying a feedback card.
Example:
// Log no user response after feedback card
noUserResponseAfterFeedbackCard();
Response: The lack of user response after the feedback card is logged.
noUserResponseAfterQuestionPrompt()
This method indicates no user response after prompting a question.
Example:
// Log no user response after a question prompt
noUserResponseAfterQuestionPrompt();
Response: The lack of user response after the question prompt is logged.
noUserResponseAfterOffHoursPrompt()
This method indicates no user response after an off-hours prompt.
Example:
// Log no user response after off-hours prompt
noUserResponseAfterOffHoursPrompt();
Response: The lack of user response after the off-hours prompt is logged.
Script Editor Enviroment
To assist with script writing, an enviroment has been created with example JSON session Metadata. This enviroment can be accessed from this link.
As changes are made to the script, result and errors are available in real time for review:
[image]FAQs/ScriptEditor.png[/image]
Errors are shown in real time:
[image]FAQs/MetadataError.png[/image]
Session Metadata
All of a sessions metadata properties can be accessed through JavaScript using the following format:
sessionMetaData.<Metadata Variable>.
Default session metadata properties represented in JSON can be seen below.
Examples of Accessing Metadata Properties
Get Guest question:
sessionMetaData.Guest.Question
Get Guest Name:
sessionMetaData.Guest.Name
Get Session ID:
sessionMetaData.Session.SessionId
Default Session Metadata Properties Represented as JSON
"Guest": {
        "Name": "John Doe",
        "Id": "dl_vBFbdIv1Y0aPMOsabBBC9Q@30ce8ae3-4ac8-4a25-b2e3-a313841a625d",
        "Question": "I am unable to access Hardware Access Center for laptop replacement",
        "Locale": "en-US",
        "ChannelId": "directline",
        "GivenName": "John",
        "Surname": "Doe",
        "TenantName": "Instant"
    },
    "Session": {
        "SessionId": "a5d1fe78-d954-47bd-b196-ba4ac5da15d0",
        "StartedUtc": "2022-09-26T10:47:53.7976577+00:00",
        "ChatID": "6btnBr9ATyp5a4onmInj1D-us",
        "ReferrerUrl": "https://chime5-entrybot.azurewebsites.net/admin",
        "CurrentPipelineStage": {
            "Name": "chatend",
            "Type": "SendTextState"
        },
        "PipelinePath": [
            {
                "ToState": "start",
                "ToStateType": "SendTextState",
                "FromState": "StartChat",
                "Timestamp": "2022-09-26T10:47:59.2284505+00:00"
            },
            {
                "ToState": "azurelookup",
                "ToStateType": "KeyPhraseExtractionState",
                "FromState": "start",
                "FromStateType": "SendTextState",
                "Timestamp": "2022-09-26T10:48:02.8726515+00:00"
            },
            {
                "ToState": "chatend",
                "ToStateType": "SendTextState",
                "FromState": "azurelookup",
                "FromStateType": "KeyPhraseExtractionState",
                "Timestamp": "2022-09-26T10:48:23.4607605+00:00"
            }
        ],
        "SkillTagList": [],
        "AverageWaitTime": {
            "String": "0:00:00",
            "Seconds": 0,
            "Minutes": 0,
            "TotalSeconds": 0,
            "TotalMinutes": 0
        },
        "AverageWaitTimeLastHour": {
            "String": "0:00:00",
            "Seconds": 0,
            "Minutes": 0,
            "TotalSeconds": 0,
            "TotalMinutes": 0
        }
    },
    "clientActivityID": "1664189273805oy691xusb5",
    "azurelookup_language": "English",
    "azurelookup_keywords": "hardware,access,center,laptop",
    "azurelookup_entities": "hardware, laptop",
    "System": {
        "CurrentTimeUTC": "2022-09-26T10:48:24.7578914Z",
        "BaseUrl": "https://chime5-entrybot.azurewebsites.net",
        "Tenant": "ChimeV5",
        "PipelineName": "Azure Keyword Extraction Sample",
        "MediaUrl": "https://chime5-entrybot.azurewebsites.net/media/"
    }
}
Orchard JavaScript Methods
Script Method - createContent
This method creates a content item in Orchard
createContent('ContentType', 'Publish':true|false, {'Content-Properties-As-JSON'})
Example of create content script method:
createContent('EvalRegistration', true, {"DisplayText": "Eval: Form Script, jdoe@domain", "EvalRegistration": {},"TitlePart": {"Title": "Eval: John Doe, jdoe@domain"}})
The JSON Structure of any existing content can be veiwed under the "actions" dropdown of the content item.
[image]FAQs/ViewAsJson.png[/image]
[image]FAQs/JSONViewOfContentItem.png[/image]
Only the following fields need to be included when creating a content item:
{
  "DisplayText": "Eval: Form Script - Vivek, vgarg@outlook.com",
  "EvalRegistration": {},
  "TitlePart": {
    "Title": "Eval: VG TEST - VG, vgarg@outlook.com"
  }
}
How to Create an HTML Email Feedback

Screenshot: HTML feedback email in Outlook
There are 3 components when adding an HTML email feedback. First is the HTML email itself; second is the API to submit the feedback to; and third is the HTML page that you want the users to get redirected to after submitting the feedback from the email.
Step 1 - Add email action to your chat workflow
Open your chat workflow settings, and add an action to send an email. Typically this action is located at the end of the chat workflow.
Screenshot: Adding email action to the support chat workflow
Step 2 - Add the HTML template
Copy paste the following HTML template into the chat workflow email settings. Make sure to test on Outlook and that the HTML works there.

Screenshot: Chat workflow email settings
Step 3 - Create a web page to redirect user after submitting feedback from email
There are buttons in the feedback email to rate the experience from 1 to 5. Each button is a clickable link. When a user clicks on that link, it should open a web page and the feedback will be submitted from that web page.

Screenshot: Web page to submit the feedback
And here is an example code of that feedback page users redirect to.
<div class="container">
        <div class="row justify-content-center">
            <div class="col-sm-12 col-lg-5">
                <div class="card shadow-none my-5">
                    <div class="card-body p-4">
                        <div id="feedbackContent">
                          {% form asp_action:"PostFeedback", asp_controller: "Feedback", asp_area: "ChimeV5.GuestFeedback",  method:"post" %}
                            <h4 class="text-center mb-2">Thank you for the feedback!</h4>

                            <div class="text-center star-rating mb-4">
                                <i class="fas fa-star" onclick="updateStars(1)"></i>
                                <i class="fas fa-star" onclick="updateStars(2)"></i>
                                <i class="fas fa-star" onclick="updateStars(3)"></i>
                                <i class="fas fa-star" onclick="updateStars(4)"></i>
                                <i class="far fa-star" onclick="updateStars(5)"></i>
                            </div>

                            <div class="mb-1 text-center">
                                <label for="feedback" class="form-label">Would you mind sharing more details about your experience?</label>
                                <textarea class="form-control" id="feedback" rows="4" placeholder="Tell us more about your experience..."></textarea>
                            </div>

                            <button class="btn btn-primary w-100" onclick="submitFeedback(event)">Submit Details</button>
                          {% endform %}
                        </div>

                        <div id="thankYouMessage" class="text-center py-4" style="display: none;">
                            <h4 class="text-success mb-3">Thank you for your feedback!</h4>
                            <p class="text-muted">Your response has been recorded.</p>
                        </div>
						<div id="errorMessage" class="text-center py-4" style="display: none;">
                            <h4 class="text-danger mb-3">Error saving feedback!</h4>
                            <p class="text-muted">Your response has not been recorded.</p>
                        </div>
                    </div>
                </div>
            </div>
        </div>
    </div>

    <script>
      	let sessionId = "";
        document.addEventListener('DOMContentLoaded', function() {
            const urlParams = new URLSearchParams(window.location.search);
            const rating = urlParams.get('rating') || 4;
            //document.getElementById('ratingValue').textContent = rating;
            updateStars(rating);
      		sessionId = urlParams.get("SessionId");
      		if (!sessionId){
				sessionId = urlParams.get("sessionId");
      		}
      		console.log("SessionId is ", sessionId);
            for (const [key, value] of urlParams.entries()) {
              console.log(`${key}: ${value}`);
            }
        });

        function updateStars(rating) {
            const stars = document.querySelectorAll('.star-rating i');
            stars.forEach((star, index) => {
                star.className = index < rating ? 'fas fa-star' : 'far fa-star';
            });
        }

        function submitFeedback(e) {
            e.preventDefault();
            let postUrl = "/feedback/PostFeedback";
            postUrl = $("#feedbackContent form").attr("action");
            let numStars = 0;
            const stars = document.querySelectorAll('.star-rating i');
            stars.forEach((star, index) => {
              if (star.className.indexOf('fas fa-star')>=0){
				numStars++;
			  }
            });
      		const comment = document.getElementById("feedback").value;
            const antiForgeryToken = $("input[name='__RequestVerificationToken']").val();
      		const data = {
      			__RequestVerificationToken: antiForgeryToken,
      			SessionId : sessionId,
				Feedback : [
      				{Key:"Guest.SessionRating", Value: numStars},
      				{Key:"Guest.SessionComment", Value: comment}
      			]
      		};
      		$.post({
      			url: postUrl,
      			data: data
      		}).done(function(response){
            	document.getElementById('feedbackContent').style.display = 'none';
				document.getElementById('errorMessage').style.display = 'none';
            	document.getElementById('thankYouMessage').style.display = 'block';
      		}).fail(function() {
                console.log("Error submitting chat session feedback");
      			document.getElementById('errorMessage').style.display = 'block';
            	document.getElementById('thankYouMessage').style.display = 'none';
            });
        }
    </script>
Escalate your support from chat to Teams Meeting

Chat support escalation flow from self-service to Teams meeting with a live agent
You can now escalate support from chat (webchat or Teams chat) to Teams meetings. Which enables screen sharing for more complex technical issues.
Here's a detailed breakdown of each stage:
User Initiates Self-Service
First point of contact
User attempts to solve issue independently
Typically involves FAQ sections, knowledge bases, or automated troubleshooting guides
Reduces load on support staff
Available 24/7
AI Provides Assistance
Chatbot or AI system engages if self-service insufficient
Handles common queries and basic troubleshooting
Uses natural language processing to understand user issues
Can access knowledge base and provide solutions
Collects relevant information before potential human handoff
User Connects to Live Agent
Triggered when AI cannot resolve issue
Seamless transition with context preservation
Agent receives full interaction history
Handles complex issues requiring human judgment
Provides personalized support
Agent Creates Teams Meeting Link
Used for issues requiring visual demonstration
Enables screen sharing and real-time collaboration
Better for complex technical support
Allows multiple participants if needed
More personal than chat interaction
User Joins Teams Call
Direct video/audio communication
Screen sharing capabilities
Real-time problem resolution
Recording options for future reference
More efficient for complex explanations
Building a Self-Learning AI Help Desk with RAG & ChatGPT
How Would You Design a RAG Help Desk System with ChatGPT?
Think of it as a feedback loop:
1. Employee asks question
2. ChatGPT tries to help using company knowledge
3. Did it work?
- Yes → Done
- No → Goes to human agent
The clever part is how it learns:
- Managers see what ChatGPT couldn't answer
- They add missing knowledge through a simple form
- ChatGPT immediately uses this new information
- Future similar questions get answered automatically
The key is making it super easy for managers to spot and fill knowledge gaps. When they see unanswered questions in their dashboard, they can quickly add the right information and test if ChatGPT now handles similar questions correctly.

Visual on improving RAG for internal helpdesk
Using ChatGPT and Teams for Internal Helpdesk and knowledge base
ChatGPT and Teams are the perfect tools for helpdesk solutions.
How it works:
1. The AI (powered by ChatGPT) analyzes your question
2. Searches your company's internal knowledge base
3. Provides a conversational response that summarizes the relevant article
4. Shows you the complete support documentation within Teams
Real example:
Ask: "How do I connect the HP PageWide printer?"
The ChatGPT-powered AI will:
- Give you a clear, conversational answer
- Reference the specific knowledge base article
- Display the full guide with images and step-by-step instructions
- Keep everything within your Teams window
View KB article within Teams
How to upload documents or files for ChatGPT AI indexing
Reference .pdf, .pptx, .docx, etc. documents in AI chat
AI file reference example
This feature allows you to easily add reference files, so when you ask a question, AI can search for answers directly within the uploaded documents. Here’s how to upload your files and start using them:
Step 1: Go to the Manager Dashboard
Step 2: Navigate to the Manage FAQ Files Section: Under the FAQs dropdown menu, select Manage FAQ Files.
Manager dashboard
Step 3: Click on New FAQ File Item to begin uploading your document.

New FAQ File Item button
Step 4: Enter Title and Upload:
Provide a clear title for your file so it’s easy to locate later.
Click the upload button to select and upload your file.

New FAQ File form
Step 5: Publish Your File: Once uploaded, click Publish to make it accessible for AI search.
Important Note
After publishing, it may take up to 30 minutes for the AI to index the file. Once indexed, your file will be available for AI-powered search responses.
For any questions, reach out to our support team at support@instant-tech.com.
Escalate AI Chats With Multi-Level Support
Escalate Agent Chat Service Tier

Transfer chats to other pipeline stages/agent lists with the agent escalation feature
This feature is helpful for service desks with multi-level or departmental support groups. You can to specific groups of agents based on the user queries such as HR or App support
Escalation allows for incoming users to be routed to the best agents for their support needs
Through the use of this feature the amount of wait time for incoming users where agents need to gather information and troubleshoot is cut down by routing to an agent list under the category for their support query
Connect To Agent With Escalation Features
Ensure the following feature is enabled:
ChimeV5.Pipeline.ConnectToAgentWithEscalation

Ensure the feature is enabled: ChimeV5.Pipeline.ConnectToAgentWithEscalation
When the feature is enabled it adds in a pipeline stage, flow stage, associated metadata, and reports using associated metadata.
Pipeline Configuration
Key: ID of the pipeline item
Next Stage: ID of the pipeline item to invoke if the chat was connected to an agent. Leave blank to end chat
Drop Stage: ID of the pipeline item to invoke if the chat was ended before connecting to an agent. Leave blank to end chat
Maximum Wait Time: Number of seconds that a chat can wait without being connected to an agent before timing out
On Waiting Timeout Next Stage: ID of the next pipeline item to invoke if the chat is not routed to an agent before the max waiting time
Still Searching for Agent Message Interval: Number of seconds between sending the still searching for agent message
Agent Accept Timeout: Number of seconds before a prompt to an agent to accept a chat expires
Routing Mode: Method that will be used to select agents to route to (Broadcast Routing or Round-Robin Hunt Routing)
Agent List: The list of agents that will be routed to and prompted
Escalation Options: Options for escalating the chat to another pipeline stage or agent list
Adaptive Card Messages:
Guest Initial Waiting Message: Message sent to the guest when starting to search for an agent
Still Searching for Agent Message: Message sent to the guest periodically when still searching for an agent
Guest Connected to Agent: Message sent to the guest when they are connected to an agent
Agent Connect to Guest: Message sent to the agent when they are connected to the guest
Agent Left Chat: Message sent to the guest when the agent levaes the chat
Guest Left Chat: Message sent to the agent when the guest leaves the chat
Guest Escalated Message: Message sent to the guest when they are escalated to another agent or agent list


Agent Experience

Agents can escalate a chat by selected the escalate button or typing /escalate
Agents are then prompted with escalation options and upon selection are disconnected from the chat.
Incoming User Experience

Incoming users after being escalated are notified in chat
When the incoming user begins routing to a new agent list after escalation they will see the guest initial waiting message
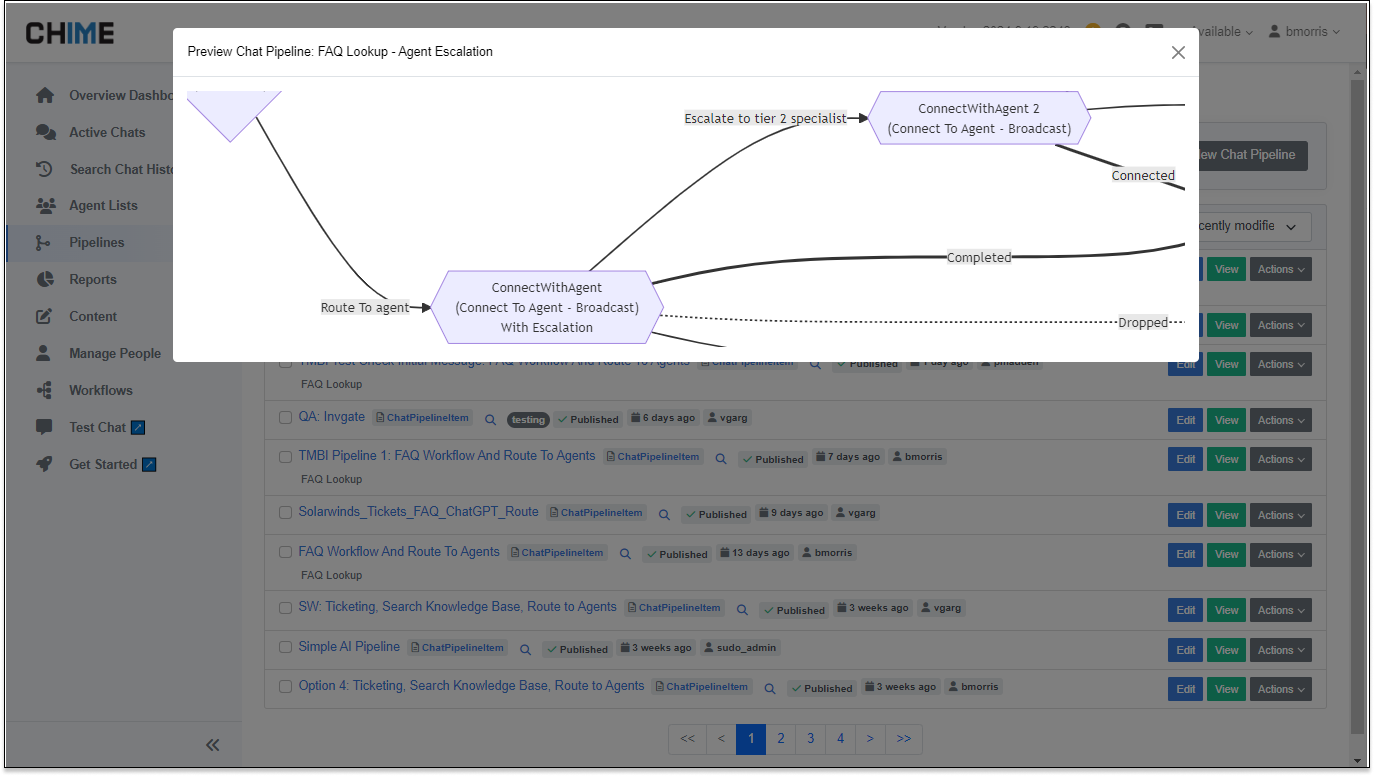
Metadata & Flow
When the chat session has ended the metadata and flow tab are both populated. The flow tab shows when the agent escalated the chat and to which pipeline stage/agent list they transferred to. Metadata also shows this with some additional details:


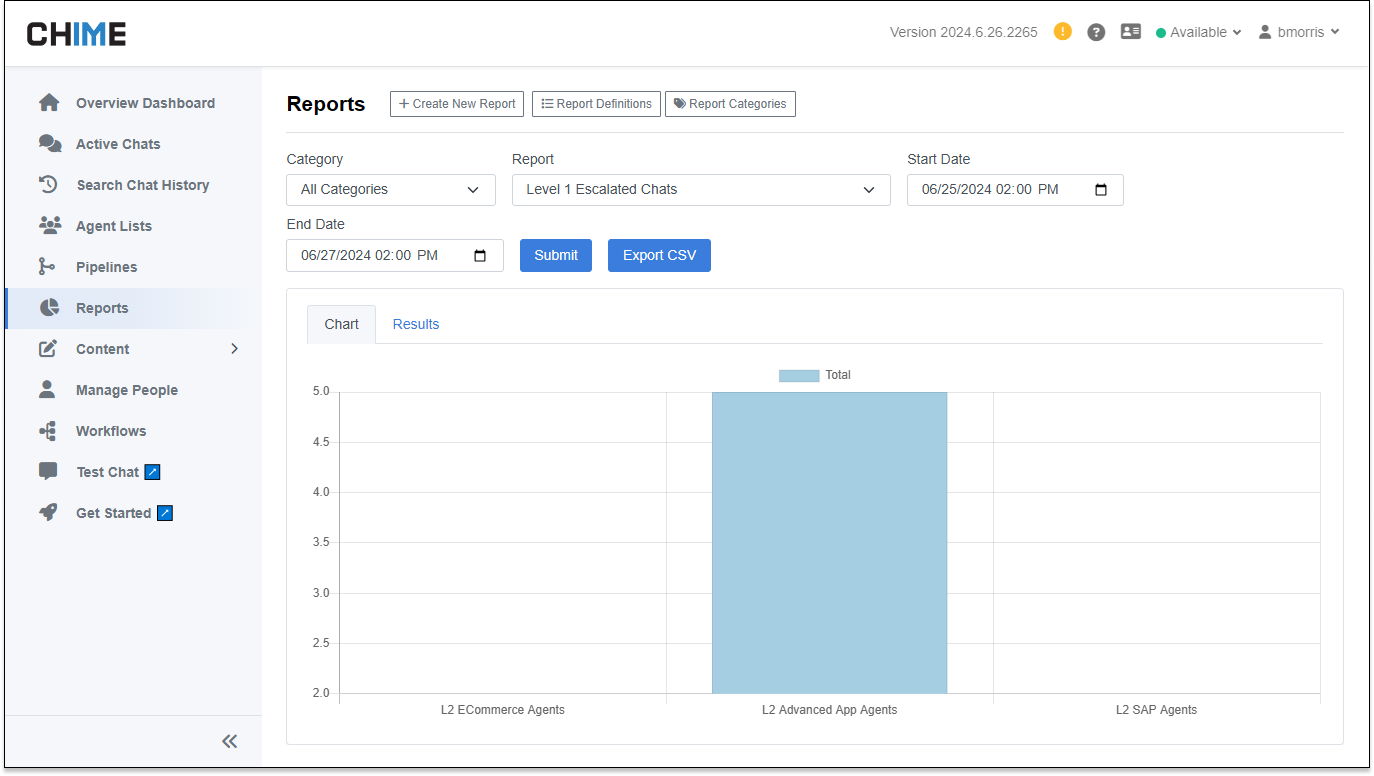
Reports
We have associated reports that are added when the escalation feature is enabled allowing for easy tracking of escalated chat sessions.
Level 1 Escalated Chats
Level 1 Chats Handled vs Escalated Over Time
Level 1 Chats Handled vs Escalated by Agent


How to Update Branding Images for your Chime Deployment
Customize The Look Of Your Tenant
If you want to update the way Chime looks to your users when they are in a chat session, this guide will show how to update the images used for messages sent in chat sessions and on your Chime tenant’s web interface. If you are looking for how to update the Image for the Chime V5 Teams App we also have this guide on Steps to Customize (Apply Branding) Teams App in Teams Admin
Navigate to Media Library
First thing we will want to do is find where these images are stored.
Navigate to Admin, then Media Library (either from the dashboard page, or from the left-side menu Chime Advanced > Media Library)

Select the _branding folder from the Media Library menu. In this folder you should see images that are important for branding. In this guide we will cover the most important ones:
card-logo.png
favicon.ico
logo.png
tenant-logo.png

Favicon icon
The favicon icon will be what your Agents, Managers, and Admins see on the Chime web portal as the icon at the top of the page/tab. This can be updated to be more in line with your organizations icon
Tenant Logo
The tenant-logo will display in the top left of the header on each page while on the Chime web portal. Typically this is an org or helpdesk logo image to tie the branding of your Chime tenant over to your organization.
Card Logo
The card-logo.png image is used primarily on adaptive cards sent by Chime over to the end-user or the Agent during a chat session. Here are all the spots it can show up by default:
Tenant Settings > Chat Commands and Events
Install Welcome Message
Generic Help Message
Greeting Command Message Before a Chat
Greeting Command Message During Chat
Pipeline Adaptive Cards
Welcome Card Form when user stars a chat
FAQ Lookup Results
User Feedback Card
Pipeline Help Message
Pipeline Invalid Command Message
Chat Routing to Agent Cards
Guest Initial Waiting Message
Still Searching for Agent Message
Guest Connected to Agent
Agent Connected to Guest
Agent Left Chat
Guest Left Chat
How to Update the Install Welcome Message for the Teams App
Customize Or Disable Your Welcome Message
This guide will cover how a Teams Admin can configure what message an end user sees when Chime V5 is installed on their Teams Client. The default message is a general welcome message to Chime, but you will likely want to update it to fit the branding and feel of your Chime use case. Additionally, you also have the option to disable this message so users are not messaged by the app until they choose to use if for the first time.
Navigate to the Admin Dashboard, then Chime Settings and Tenant Settings.
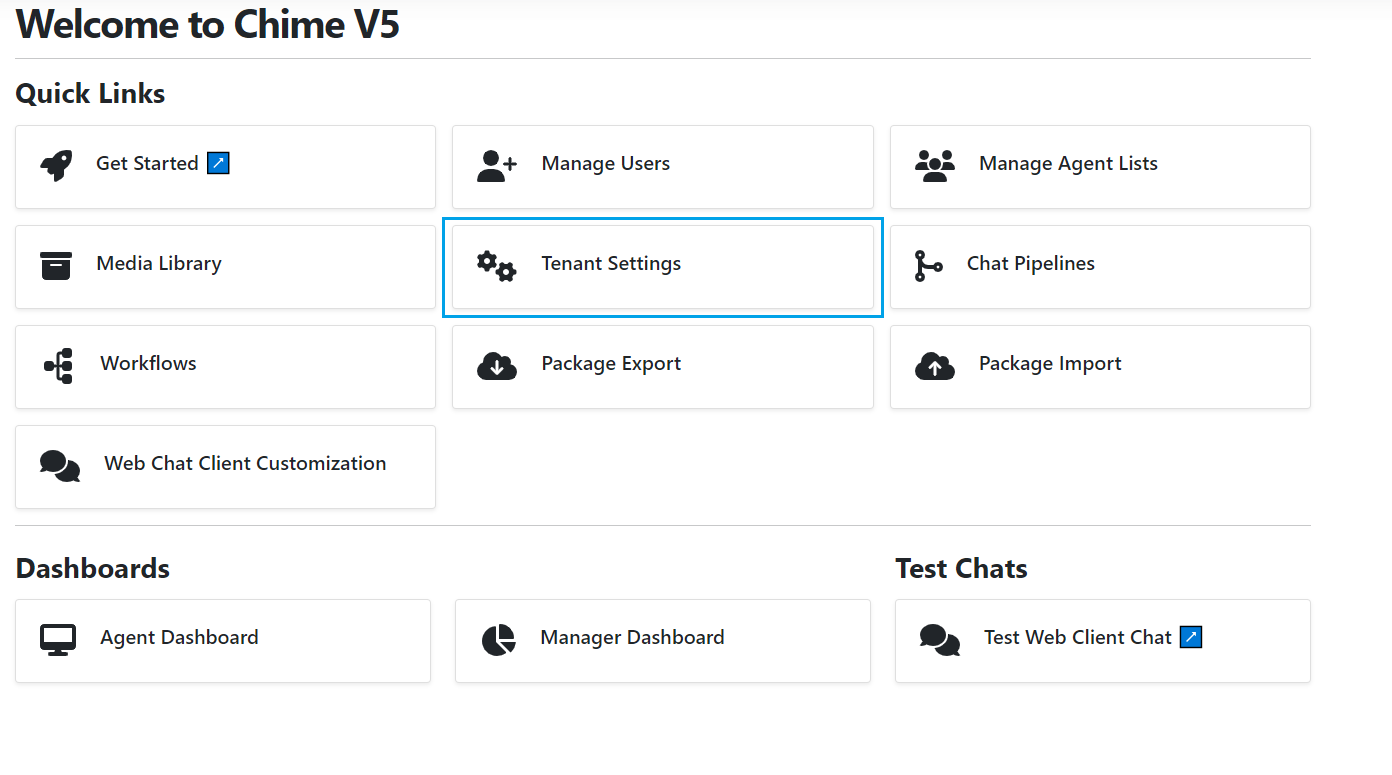
Configure your tenant settings to set your chat application settings - you must be a Chime administrator to configure this setting
Configure your chat application setting
Click on the Chat Commands and Events tab.
For the Install Welcome Message option, choose if you want this to be enabled or disabled using the setting Disable Welcome Message.

Set the initial welcome message that Microsoft Teams will send to the employee when the app is added
These welcome messages are configured as adaptive cards - they can be updated using our adaptive card editor
If you want to update the message, click on the Editor tab, then Pop out card Editor option.

Launch the adaptive card editor - to configure the MS Teams first use message
The first use message is sent when the MS Teams app is pushed across your organization - during onboarding and deployment
In the editor, click on the text in the middle to select it.
On the right-side of the editor, there will be Element Properties that show up, under the Text option, you should be able to edit any of the existing text to suit your Chime use-case. If you would like to add any additional elements here are some Adaptive Card samples that can help with learning how to use them Adaptive Card Samples and Templates.

Adaptive cards are easy to use, powerful, and great for our chat sessions
Our chat workflows use Microsoft Adaptive Cards to collect information during the chat, send chat responses, and prompt for chat UI.
Once you are done updating the card, click Save Card.
When if prompts you to close the card designer, click OK.
Back on the Chime Admin area, click the Save button in the bottom left.
Here is an example of what this welcome message will look like by default in the Chime Teams app.

Adaptive cards look great in Microsoft Teams and are used throughout our chat application
Here an adaptive card is delivering a simple welcome message as an employee starts a chat session to get some help.
How to approve the Chime V5 Chat app
Authorize installation for users in your organization
Deploying our enterprise chat application across your organization will allow any, or maybe just a subset, of employees to use our chat application to search Chat FAQs, use Chat Q&A services, Chat with AI, and route chat requests to service desk agents. In other words, solve employee problems and issues using chat :)
Since Chime is a chat service available from the Microsoft Teams Store, the organization’s MS Teams Admin will need to make the application available organization wide and update MS Teams App Policies.
In this guide, we will cover how to make the Chime V5 Teams app available to install for users in your organization. This will require a Teams Admin to complete the following steps to ensure that your organization will be able to use the Chime V5 app propperly.
In the Microsoft Teams Admin Center navigate to Teams Apps, then Manage Apps >>
Click the button labeled Org-wide app settings in the top right.

The MS Teams Admin will need to change the or-wide app settings using Manage Apps
This step requires the MS Teams Admin with rights to set org-wide settings
In the settings panel that slides in, set the setting Third-party apps to On (if it is already set to on, you do not need to make any changes)
You can leave the settings New third-party apps published to the store and Auto install approved apps off if they are not already enabled.

Enable third-party apps in the organization-wide settings
Whatever it is, the way you tell your story online can make all the difference.
Click Save and close the settings panel.
Next, navigate to Teams Apps, then Permission Policies >>
Select an existing permission policy to apply this to. For the rest of this guide we will be using Global (Org-wide default), but you can test it on a smaller group if you want to before pushing to the entire org.

Clear example of the MS Teams Admin setting Permission Policies and setting Global (org-wide default)
After the MS Teams Permission Policies are updated, the chat service desk app can be installed across the organization

Select the Third-party apps dropdown option and make sure to set it to Allow specific apps and block all others
If it has previously been set to the Allow all apps option, leave it set to that and you do not need to progress into the guide any more, you are done
Click the Allow apps button (or the + Add Apps button if there are already some within this option).

Teams admin allow apps to get installed across the organization
Have the Teams admin specify the app to allow is across the organization - to deploy chat FAQ and AI Powered Chat App for everyone in company
A panel will open where you can search for apps to allow. Search for Chime V5, and select it when it appears in the options.
Click Allow.

Enable Chime V5 for Org Wide Deployment
Centrally deploy enterprise chatbot for chat FAQ and Chat service desk
Verify that Chime V5 shows up under the Allowed Apps section and click the Save button to apply changes.

Push chatbot Chime V5 to everyone in organization using Microsoft Teams
Final step to make chat application available to everyone using Microsoft Teams
Set Up Adaptive Card Notifications Via Help Desk Workflows
Notify Users When A Chat Session Is Resolved
Our enterprise chat platform includes chat FAQ lookup, Chat Q&A, integration with ChatGPT, and routing to service desk agents.
In this guide, you'll learn how to set up a workflow that automatically sends an adaptive card to a guest user after an agent marks a session as resolved. This pattern can use the chat workflow engine to monitor any chat session values and send information to the employee based on any updates to the metadata - in this case, when a service desk agents marks that as resolved using the agent UI.
Follow the steps below to create and configure this workflow in your Chime environment.
Step 1: Create a Workflow
- Navigate to the Chime Advanced > Workflows page via the Admin menu.
- Click the Create Workflow button in the top right corner.

Create a background workflow task to monitor the data in all active chat sessions
When the agent marks the chat session as resolved, the workflow engine will send the employee an adaptive card with the updated status
- Name the workflow and click Save.
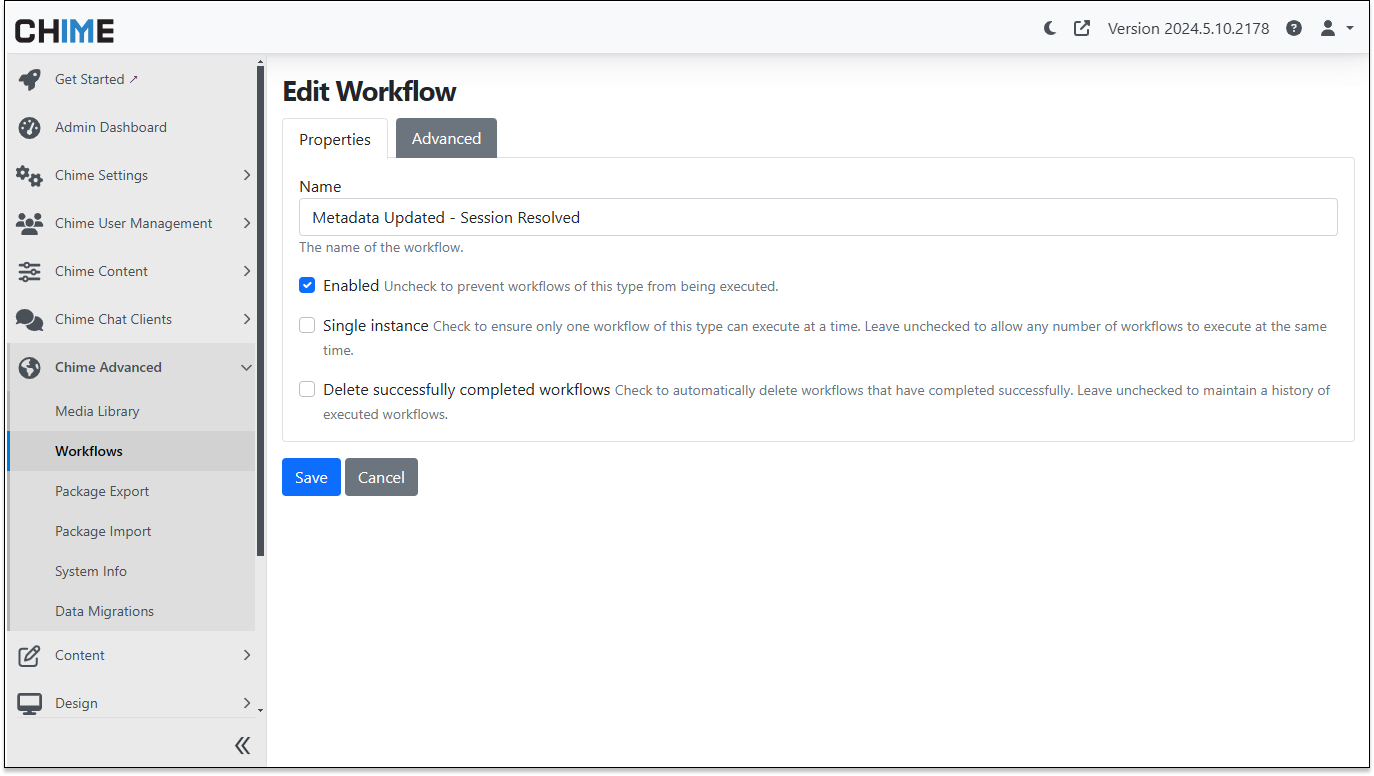
Our chat platform uses the Orchard workflow engine
Any chat session can raise a workflow task - and workflow tasks can run in the background and monitor all active chat sessions
Step 2: Add Session Metadata Updated Event
- On the Workflow editor page, click the Add Event button.

Monitor workflow events to trap the event when a chat session has the underlying chat data changes state
Workflow events, combined with adaptive cards, are a group combination for chatbot FAQs and chat Q&A
- In the pop-up window, scroll through or search for Session Metadata Updated.
- Select the Add button next to the event.

Monitor with chat session metadata changes - and then send an adaptive card
The Orchard workflow engine is powerful and our chat platform connects to the Orchard workflow engine
- Name the event
- Uncheck the 'Execute on every metadata change' toggle
- Under the 'Selected Metadata Keys' field insert: Session.Status.IsResolved

Just filter on the event where the chat session is marked as resolved.
Our chat platform raises a lot of internal events - in this case, just filter the metadata where the chat status is marked as resolved
Step 3: Add If/Else Task
- On the Workflow editor page, click the Add Task button.

Add workflow task to monitor active chatbot sessions
Chime V5 has a workflow engine that monitors all active chatbot, and chatFAQ, sessions - and can trigger events and tasks -
- In the pop-up window, scroll through or search for If/Else.
- Select the Add button next to the task.

Our chat workflow engine includes conditional logic and JS
Conditional tasks may be created based on chatbot events and conditions with active chats in Chime and our employee assistance platform
- Name the task, input the condition expression, and click Save.
Condition Expression:
input("ChangedMetadata").find((element) => element.Key == "Session.Status.IsResolved").Value == "True"
Add conditional workflow to any chat session
Here, active chat sessions are monitored and custom workflow events and tasks can notify employees of updates to the chat
Step 4: Add Send Adaptive Card Task
- On the Workflow editor page, click the Add Task button.

Easy send a Microsoft adaptive card using chat
Use chat to send an adaptive card
- In the pop-up window, scroll through or search for Send AdaptiveCard.
- Select the Add button next to the task.
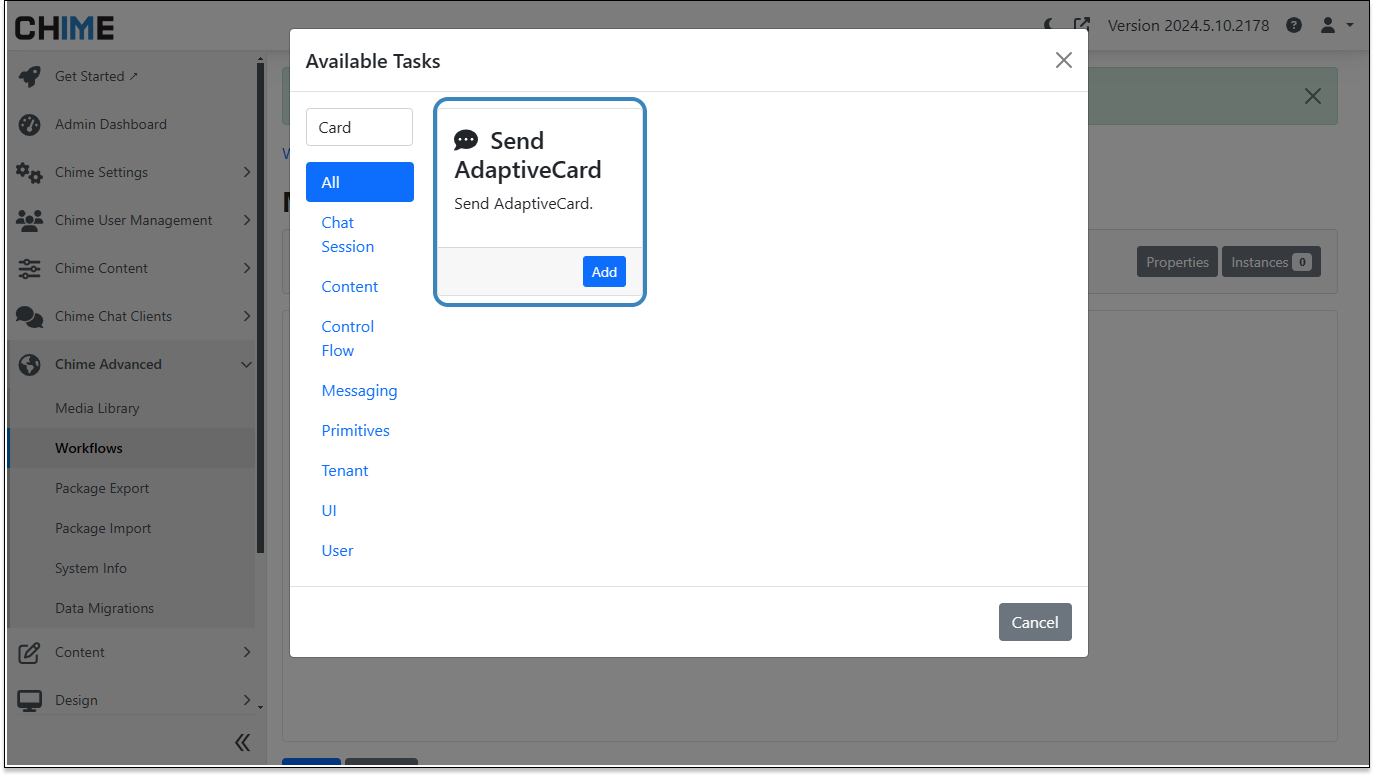
Use chat within Microsoft Teams to send an adaptive card
Our chat platform includes an adaptive card library as well as a workflow engine that can easily respond to chat events with a custom adaptive card
- Name the task, input the Adaptive Card JSON, and click Save.
Adaptive Card JSON:
{
    "type": "AdaptiveCard",
    "version": "1.3",
    "$schema": "https://adaptivecards.io/schemas/adaptive-card.json",
    "body": [
        {
            "type": "TextBlock",
            "text": "Your issue is resolved: ${Session.Status.IsResolved}",
            "wrap": true
        }
    ]
}
Use workflow within Microsoft Teams to send an adaptive card
Use the Microsoft Adaptive Card designer to create custom adaptive cards delivered via chat to Microsoft Teams or a web chat channel
Step 5: Connect the Event and Task Modules
- In the Workflow editor, drag the blue dot from the event to the If/Else task to connect them.
- Next, drag the green dot labeled 'True' from the If/Else task to the Send Adaptive Card task. This ensures the workflow proceeds correctly when the condition is met.

Build custom workflow for chat sessions - respond to custom chat based events
Here you can configure what response you want to send for the function’s ‘True’ result
Step 6: Enable and Start the Event and Task Modules
- Select each module and click the power icon to enable and start it.
- Once all modules are enabled and displayed in green, click the Save button at the bottom of the screen to save the workflow.
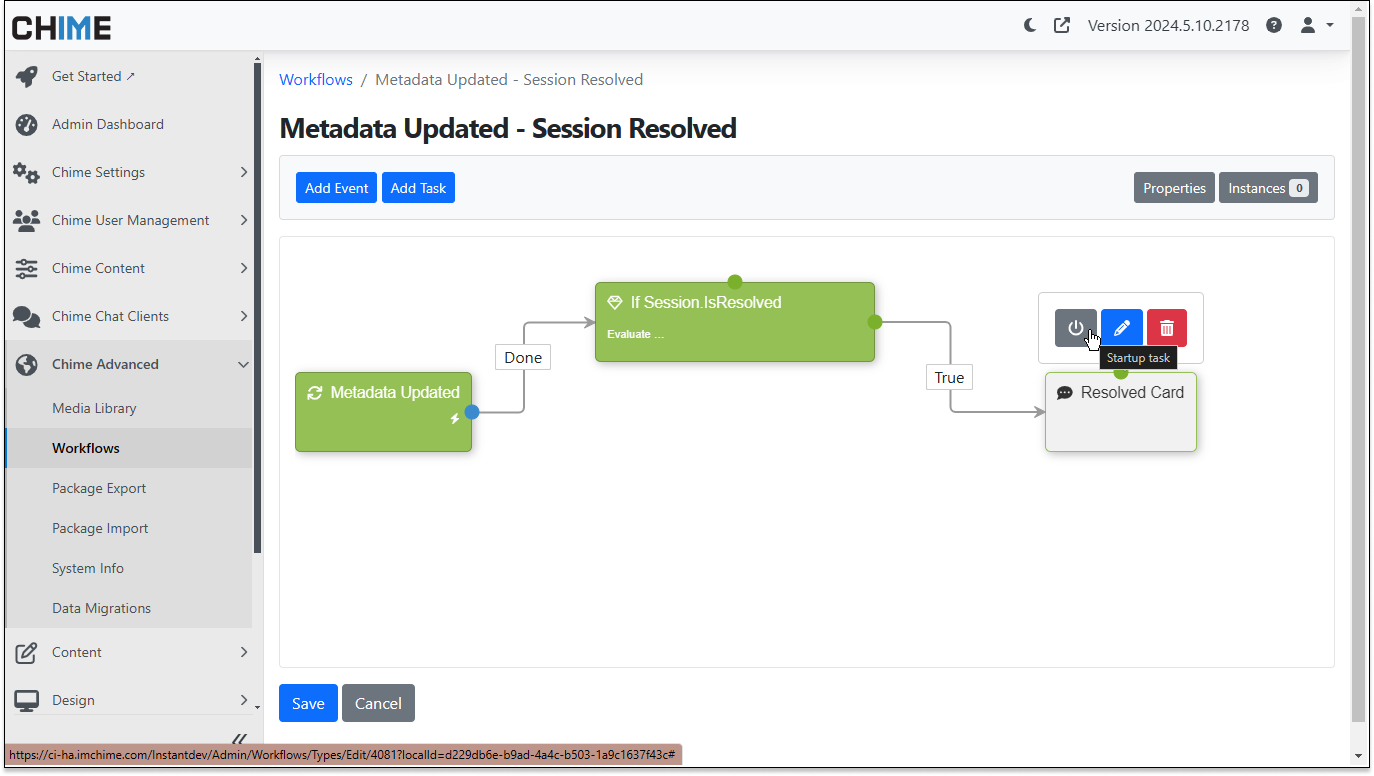
Enable the stages and save to make your chat workflow active
If you ever want to make edits to the workflow, disable your stages first to ensure no failed instances
Testing the Workflow
- Start a chat session and connect with an agent.
- Mark the session as resolved within the Agent UI.
- Verify that the guest user receives the adaptive card indicating their issue is resolved.
By following these steps, you can set up a simple workflow that enhances the customer experience by providing automated updates through adaptive cards.
Example of a chat FAQ app replying and routing to an agent
Enable your service desk agent to accept chats from employees and quickly solve employee problems using chat
Related Content
How to: Create a workflow that sends a card to guest when the session is resolved - FAQ Article
How to: Send custom HTML emails using the send email pipeline item or send email workflow task - FAQ Article
How to: Use workflows to send emails when content is created, deleted, published, updated etc… - FAQ Article
How to Make a Chatbot for FAQ Articles and Make Sure They Open in Teams Correctly
Open FAQ Links In Microsoft Teams
Creating Links
Use our embedded content management system (CMS) to create an FAQ chatbot and have the FAQs display in Microsoft Teams. This article will show how to quickly do this using our FAQs and a simple chatbot (chat pipeline) You can get started in one of two ways:
1. Use the Create Link button to have a link created for you.

Use FAQ system to create text that will be used in the FAQ chatbot
You can add any text that you’d like to the FAQ and also reference additional FAQs, SharePoint articles, or other content
2. Type out the Link format inline.
[Link Text](URL) — Used if you want the user to navigate to the link in the same page.
[Link Text](URL){target="_blank"} — Used if you want the user to navigate to the link in a new tab.
Replace Link Text with the text you want to display for the link, and replace URL with the actual URL you want to link to.
The target="_blank" attribute tells the browser to open the linked document in a new tab or window. So, for example, if you want to create a link to Google that opens in a new tab with the text "Google", you would write:
[Google](https://www.google.com){target="_blank"}Formatting Notes for Links Displayed in Teams
If you want links within FAQs to work well in Teams, there are a few formatting properties to consider:
If you are linking to page hosted in Chime (FAQ article, page, chat history, etc…) you just need to use [Link Text](URL) format
If you are linking to a page outside of Chime (SharePoint page, Knowledgebase article, video, etc…) you will need to use the specific [Link Text](URL){target="_blank"} format as they will either not be whitelisted to display, or the content provider will not allow the page to be displayed in Iframes which is what Teams uses to show links.
Here is some additional documentation on markdown syntax to help if you have any additional questions: Markdown Guide: Links Syntax
Example
This is what it will look like in the Teams client if you have a link to an outside source (for example, if content is still stored in SharePoint and is located outside of the embedded CMS FAQ system:

For example, reference a SharePoint or external link from the FAQ chatbot
These FAQs will show during the chat session and will be displayed within Microsoft Teams
Display a FAQ chatbot from within Microsoft Teams
You build the FAQs and let our chatbot display the FAQS when employees search for help - display the FAQs within Microsoft Teams
To fix this issue, we will want to update the links to all include the {target="_blank"} attribute to them. This is how it will look for users once that is updated:

Edit the FAQ ChatBot using markdown or html - our chatbot does the work
Build the FAQs and our chat pipeline will convert these into a great ChatBot system for FAQs - all within Microsoft Teams

Another example of how to Create Q&A chatbot for Teams
How to build a Q&A ChatBot for FAQS - no programming, using our FAQs, and display it all within Microsoft Teams
How to push the Teams application org-wide
Review prerequisites, step-by-step installation, and configuration tips
If you are in the process of onboarding, please make sure you have gone through and considered or completed these two steps:
Authorize Chime V5 Teams App in Microsoft Teams Admin Center >>
Steps to Customize (Apply Branding) Teams App in Teams Admin >>
Update the Install Welcome Message in Chime >>
Once you are ready to start deploying the Chime V5 app either for your small pilot testing or when pushing to it to your organization, this guide will help to lay out the steps to follow to get the app pushed as well as cover some of the customization options to consider before pushing to groups of users.
Teams Admin configures user group permissions
Navigate to Permission Policies in the Teams Admin Center. You will now need to configure policies to allow the Chime V5 Teams app to only to be accessible for your Org.
If you had previously set up the App permission policy to apply to a specific user group, you will need to update it to be org-wide. For a guide on how to do that, see this Guide on Approving Chime V5 app for your Org.

Microsoft Teams admin center - Permission policies
First, go to the Teams admin center to find the app you’d like to deploy
Additionally, you may want to automatically install and pin the Chime V5 app in the Teams client for users in the pilot. To do this you would want to update the app setup policies in the Setup Policies tab of Teams Admin Center.
Navigate to Setup Policies.

Teams Admin Center Setup policies navigation
Select the Global (Org-wide default) policy
Click on the Global (Org-wide default) setting

Org-wide installed app
You may pin the org-wide installed app into the left side navigation of Microsoft Teams
Under the Installed apps section, click on + Add apps and search for Chime V5 and select it.
Click Add. Verify that the Chime V5 app appears in the list of installed apps.
Click Save.
If you want the Chime V5 app to appear on the left-side menu for users, we will also want to pin the app.
Under the Pinned apps section, click on + Add apps and search for Chime V5 and select it.
Click Add. Verify that the Chime V5 app appears in the list of pinned apps.
Rearrange the order of the pinned apps to suit where you want the app to show up.
Click Save.
Additional note on updating Teams apps:
If you have made any branding/styling changes to the Chime V5 Teams app during this process some users may see the old version of the app name or an old/broken app icon in their Teams client.
This can typically be fixed by having the user logging out of Teams and logging back in. If that doesn’t work, the user can go in and manually clear the cache in teams following this Microsoft guide: Clear the Teams client cache >>
Here is some additional documentation from Microsoft on managing permission policies and setup policies:
Use app permission policies to control user access to apps
Use app setup policies to pin and auto install apps for users
Enable Azure login for the web app with Graph API permissions
Approve the use of Graph API Permissions for Azure AD/Entra Login
When initially onboarding the service desk you will need an Azure AD/Entra Admin to approve the use of some Graph API permissions for the service desk web application to enable Azure AD/Entra login. In this article we will cover the list of API permissions you will need and details of what each of them do and are used for. Below are the specific Graph API permissions the app will request when you are prompted to approve Azure AD/Entra login:
email - Delegated

The email permission allows the service desk app to read your users’ primary email address
openid - Delegated

The openid permission allows users to sign in to the service desk app with their work accounts
It also allows the app to see basic user profile information. Microsoft Documentation >>
profile - Delegated

The profile permission allows the service desk app to see your users' basic profile
The profile includes name, picture, user name, and email address. Microsoft Documentation >>
User.Read - Delegated

The User.Read permission allows users to sign-in to the service desk app, and allows the app to read the profile of signed-in users
It also allows the app to read basic company information of signed-in users. Microsoft Documentation >>
As the Azure administrator, we may request the Tenant Id of your org before this next step so that we are able to associate the Chime V5 instance stood up by Instant Tech team. Once the instance is ready to be linked to your AD/Entra login, the Instant Tech team will send across a link for you to approve the requested permissions.

Accept the permissions request to link your AD/Entra login for your service desk
In this permissions request it will detail the permissions we are using and allow you to consent on behalf or your organization.
Once you have accepted the permissions, the log in option for Chime V5 will associate users logging in with their Office 365 accounts and will require users to login with their org accounts.

Select the log in button on your service desk home screen
You will be prompted with the Microsoft O365 login to authenticate into your service desk

Log into your help desk tenant using Microsoft O365 authentication
Using O365 authentication allows for a much more secure service desk ensuring data privacy
Set Up Service Desk Chat With Chat Routing Notifications For Agents
Route Notifications Directly To Your Teams Channel
Our platform is designed to help resolve employee problems - typically using chat, chat based FAQs, and allow service desk agents to use chat to resolve employee questions. This web hook notification will use Microsoft Teams to send agents notifications of inbound chat sessions.
When employing Chime V5 pipeline workflows, agents can now receive notifications directly on their dashboard when new chat sessions arrive. By integrating Webhooks with Teams, these V5 workflows can be linked to a designated Teams channel, providing improved accessibility through broadcast notifications.
Add Incoming Webhook to Your Teams Channel
Navigate to Your Teams Channel
Begin by navigating to the Teams channel where you want to receive broadcast notifications.
Select More Options Menu
In the chosen channel, click on the more options menu (three dots) located at the top-right corner.
Navigate to Connectors
Depending on your Teams version there will be two different ways to get to the Connectors menu.
(Old Teams) From the dropdown menu, select Connectors.
(New Teams) From the dropdown menu, select Manage Channel, then under the Connectors section, click Edit.

Configure teams channel notifications - navigate to Teams channel connectors
From the dropdown menu, select Connectors
Add Incoming Webhook

Add Incoming Webhook from the list of connectors
Click on the Add button next to the Incoming Webhook option.

Confirm adding Incoming Webhook to your Teams channel
On the Incoming Webhook page, click Add again to configure the webhook.
Configure Incoming Webhook
Navigate Back to Connectors
Return to the Connectors menu.
Configure Incoming Webhook
Click on the Configure button next to the Incoming Webhook option.

Configure Incoming Webhook from the list of connectors
Click on the Configure button next to the Incoming Webhook option.
Fill Out Webhook Name
Provide a meaningful name for the Incoming Webhook to easily identify its purpose.
Optionally, you can also click the Upload Image button to additionally change the branding image used when it sends messages.
Create Webhook

Create web hook for chatbot - name and create your Incoming Webhook URL
Click on the Create button to generate the Webhook URL.
Copy Webhook URL
Once the URL is generated, click on the Copy button or manually highlight and copy the link.

Copy the newly generated Webhook URL - to notify using Microsoft Teams
Once the URL is generated, click on the Copy button or manually highlight and copy the link.
Configure In Chime V5 Tenant
Navigate to Chime V5 Tenant
Open your Chime V5 tenant and access the chat pipeline.
Edit Chat Pipeline
Select the Edit option in the chat pipeline.
Connect to Agent Pipeline Item
Open the details for the Connect to Agent pipeline item.
Enable Webhook
Toggle the Webhook Enabled option to activate the webhook functionality.
Paste Webhook URL
In the Webhook URL field, paste the previously copied URL from Teams.

Paste the Incoming Webhook URL into the ‘Connect to Agent’ chat flow stage
In the Webhook URL field, paste the previously copied URL from Teams.
Agent Experience
When a Guest/End User works through a chat session to start routing to agent, a broadcast notification is sent to the connected Teams channel and all Agents will have the ability to accept the chat session.

agents can accept chats using Microsoft Teams - View the Webhook Teams notifications for agents
Setup chatbot to to send a broadcast notification to the connected Teams channel
Setting Up Real-time Agent Notifications with Teams
Send Notifications Directly To Your Teams App
This feature allows agents to receive instant notifications in their Teams client when a chat is routed to them, directly from the bot. In this guide, we'll walk you through the setup process to ensure a seamless integration into your workflow.
Prerequisites
Before diving into the setup, ensure that you have the latest version of Chime V5 installed. If not, make sure to update your Chime application to access the latest features and improvements.
Integration with Teams
Chime V5's real-time agent notifications are tied into the same Orchard Feature as the Teams channel webhook notification feature. This ensures a consistent and streamlined experience for administrators and agents alike.

Features Page
Find ChimeV5.Teams.AgentNotifications feature from the admin dashboard
Agents can now receive notifications in their Teams client when a chat is routed to them, in addition to the existing webhook method for routing into a Teams Channel.

Microsoft Teams Notification Cards
Receive incoming support chat notifications within Microsoft Teams
User Settings Management
To enable these notifications, user settings must be configured to store the Teams ID and conversation ID reference for each agent. This information is added to the Orchard User record, similar to the setup for the Agent Profile.
User Settings in the Admin Area
In the Admin section, navigate to the user record, where a new "Teams Notifications" tab has been added. Here, administrators can manage Teams addresses for each user.

configure notifications using Microsoft teams - Edit User Page
Enable or disable the incoming ms teams chat notifications within your user settings
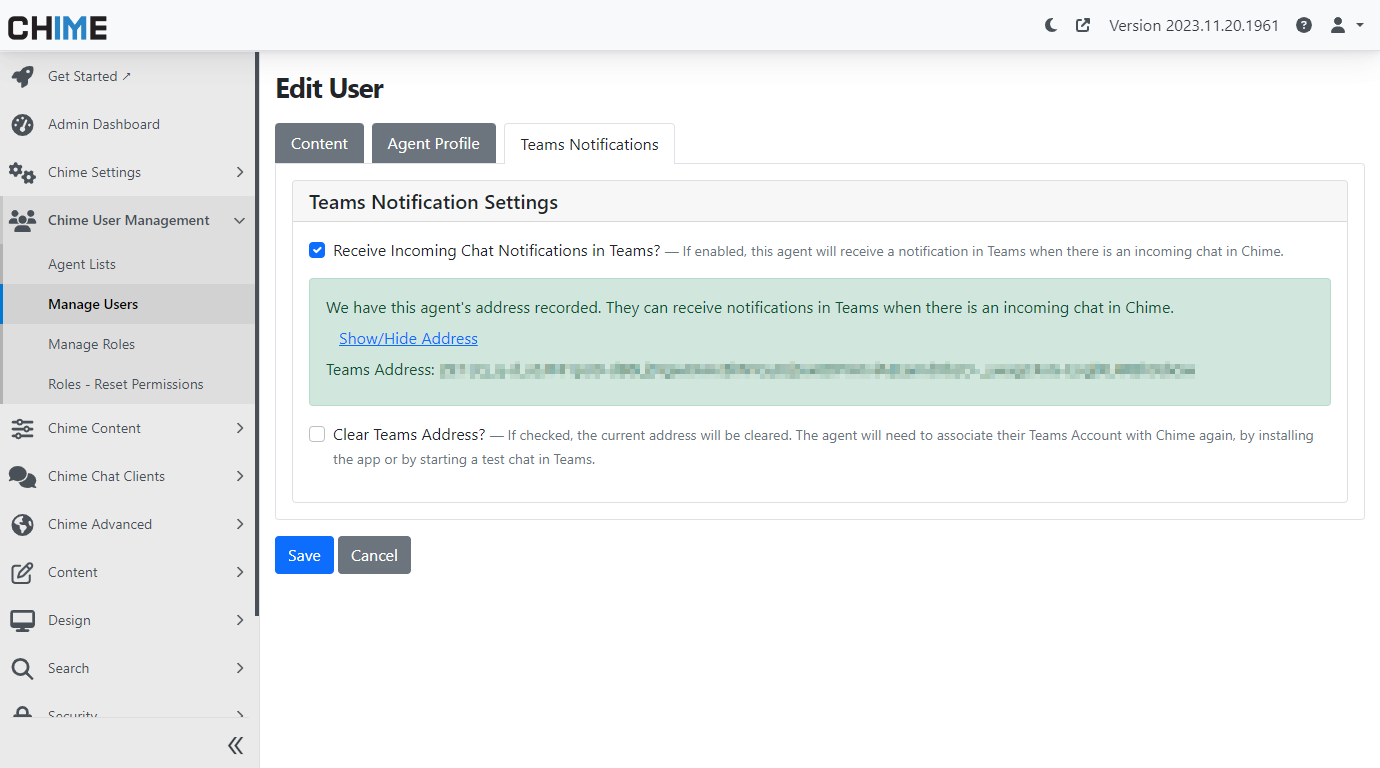
Edit User
See the Teams Address from your Teams Notifications Tab in User Settings
User Settings in Manager Area
For the Manager dashboard, a new section in the user page displays Teams notification settings. Managers can easily view and update this information when managing agents.

Edit User in Manager Dashboard
Teams notification settings is also available from the manager dashboard “Manage People“ page
User Settings for Agents
Agents can access their Teams notification settings on their Agent Dashboard Settings page. Additionally, buttons are available to Install Chime in Teams and Start Chat in Teams, facilitating the capture of Teams address information.

Agent Settings
Teams notifications or Teams integration also available from the Agent Settings
Tenant-level Configuration
At the tenant level, administrators can configure additional settings to customize the Teams integration experience.
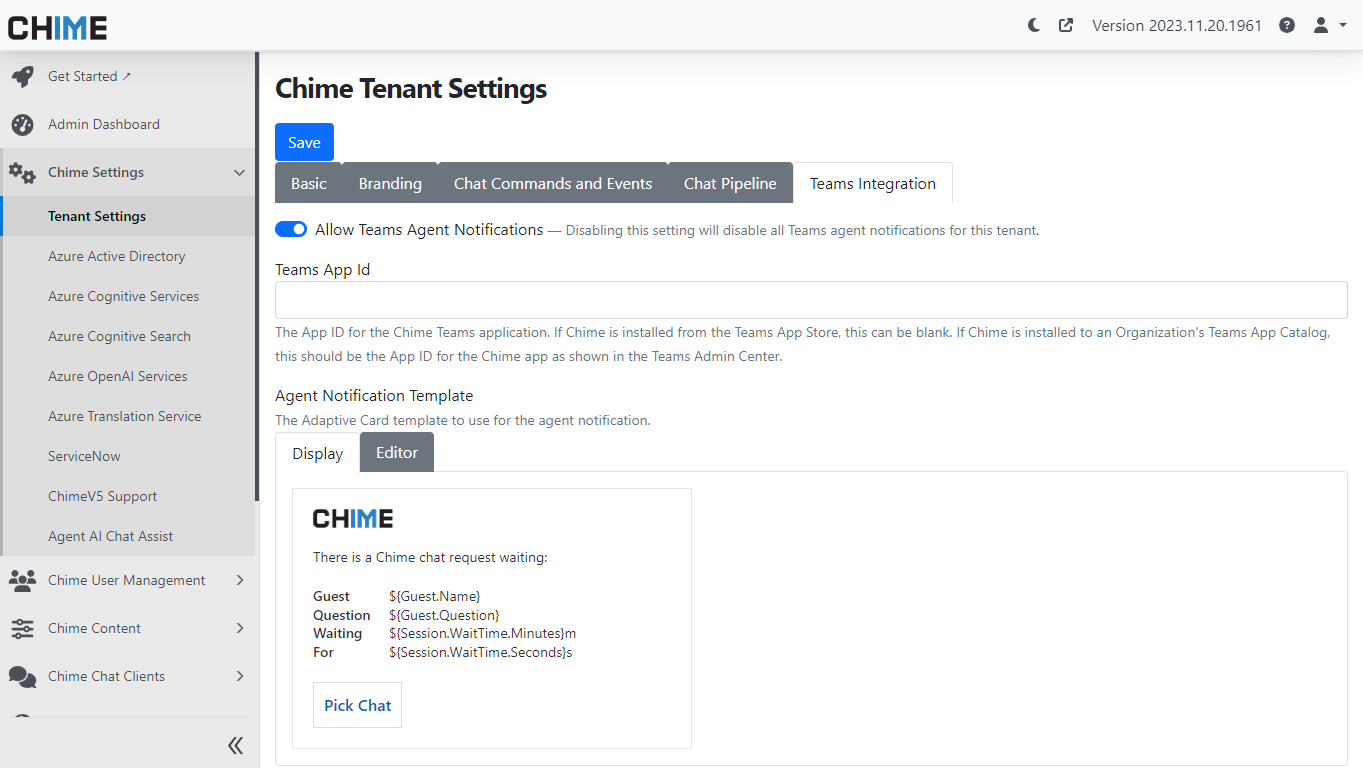
Tenant Settings - Teams Integration
Administrator can enable/disable Teams Agent Notifications from Tenant Settings and update the card sent to agents
Tenant-wide enable/disable toggle: Easily enable or disable the feature for the entire tenant.
Override for the Teams App Id: Specify the App Id based on the installation method, ensuring seamless integration.
Adaptive Card Template: Customize the notification's appearance using an Adaptive Card Template.
Sending Agent Notifications
With the setup complete, agents, having their Teams Addresses captured, will receive notifications in their Teams client when a chat is routed to them.
Agent Notification demo within Microsoft Teams
See how agent can receive and accept incoming support chat from Microsoft Teams
The implementation of this feature is seamlessly integrated into the Orchard Workflow events, requiring no changes to the chat pipeline. While it's not tied to Teams presence, agents need to have a Chime browser window open and be available to receive notifications.
Make Your Teams App Available to Everyone in Organization
Authorize Teams app using App Permissions and Policy Settings
Step 1: Go to the Teams Admin Center
URL: Teams Admin Center
Description: Start by navigating to the Microsoft Teams admin center using the provided link. This dashboard allows you to manage all settings related to Microsoft Teams.

How to update the MS Teams App Permissions and Policies
Visit the MS Teams Admin Center where you will you update the MS Teams App permission policies
Step 2: Navigate to App Setup Policies
Path: Teams apps > Setup policies
Description: Once in the Teams admin center, find the sidebar menu. Click on "Teams apps," then select "Setup policies." This section lets you manage app setup policies for your organization.

Use the MS Teams Setup Policies to make the teams app available to everyone in the organization
Specify either Global (Org-wide default) or scope the policies for a smaller POC group or group of test users if required
Step 3: Select the Global (Org-wide default) Policy
Action: Click on "Global (Org-wide default)"
Description: In the "Setup policies" section, locate and click on the "Global (Org-wide default)" policy. This will allow you to manage and edit the default settings that apply organization-wide.

How to make teams app available to everyone
Use the Global org-wide default to make the teams app available to everyone, or every user, in organization
Step 4: Add the Chime V5 App
Action:
Click "+ Add apps" (this will render a sidebar on the right side of the page)
Search “Chime V5“ and add “Chime V5”
Click Add (to save)

How to make teams app available to everyone
Add apps as a step to make teams app available to everyone

Add an app to Microsoft Teams
Allow ChimeV5 to be installed across the organization and provide a high value chatbot for your service desk
Step 5: Confirm Addition of Chime V5
Description: Ensure that Chime V5 appears in the list of apps under the policy after adding it. This confirms that it has been authorized for use within your organization.

How to make teams app available to everyone in organization
Steps on wow to make teams app available to everyone in organization and distribute to all employees
Step 6: Save and Apply Changes
Action: Click "Save"
Description: After adding Chime V5 to your app policy, make sure to save the changes to update the policy settings across your organization’s Microsoft Teams setup.

Steps on deploying teams app to everyone in organization
This will allow the Teams app to be deployed to everyone in the organization - and the app will be deployed to their teams client